Spraying Emerald Urethane Trim Enamel requires attention to detail and accuracy. When it comes to thinning this particular paint, it is essential to follow the manufacturer’s recommendations. While the general rule is to avoid excessive thinning, there are guidelines you can follow to achieve optimal spraying consistency. Here’s a step-by-step guide on how to thin Emerald Urethane Trim Enamel for spraying:
Do I need to thin emerald urethane?
Yes, you should thin emerald urethane, the manufacturer typically recommends not exceeding a 10 percent thinning ratio, which is equivalent to adding 3 ounces of water per quart. However, based on my personal experience, i have successfully thinned the paint up to 15 percent (5 ounces) without encountering any issues. It’s important to note that while this was the case, adding more water increases the risk of runs, particularly when spraying on vertical surfaces.
What do you thin emerald urethane paint with?
When it comes to thinning Emerald Urethane Trim Enamel, water is the recommended option. However, as we saw in the recent guide on thinning waterborne paints it’s important to consider a few factors before adding water to the paint. While tap water can be used without noticeable issues, using distilled water is a better choice to avoid potential problems.
Distilled water is preferred because it lacks impurities and minerals that can potentially affect the paint’s performance and application. Using distilled water ensures a consistent and reliable thinning process.
How to Thin Emerald Urethane Trim Enamel
When thinning Emerald Urethane Trim Enamel, follow these guidelines:
Step 1: Gather your materials
Before you begin, ensure you have the following items ready:
- Emerald Urethane Trim Enamel
- Mixing container
- Distilled water
- Stir stick
Step 2: Mixing
When thinning Emerald Urethane Trim Enamel, there are different approaches to the order in which you add water and paint. While some prefer adding water first, others find it more convenient to start with the paint. Here’s a breakdown of both methods:
a) Adding Water First:
Begin by adding water to the container. As a general guideline, a 10 percent water addition is often recommended. This means adding approximately 10 ounces of water for every 100 ounces of paint. Adding water first allows you to gauge the water level and ensure accuracy before adding the paint. This method can be helpful for those who prefer a systematic approach.
b) Adding Paint First:
Alternatively, you can choose to start with the paint. Begin by pouring the Emerald Urethane Trim Enamel into the container. This approach may be more suitable for those who find it easier to handle the paint first and then adjust the thinning ratio accordingly.
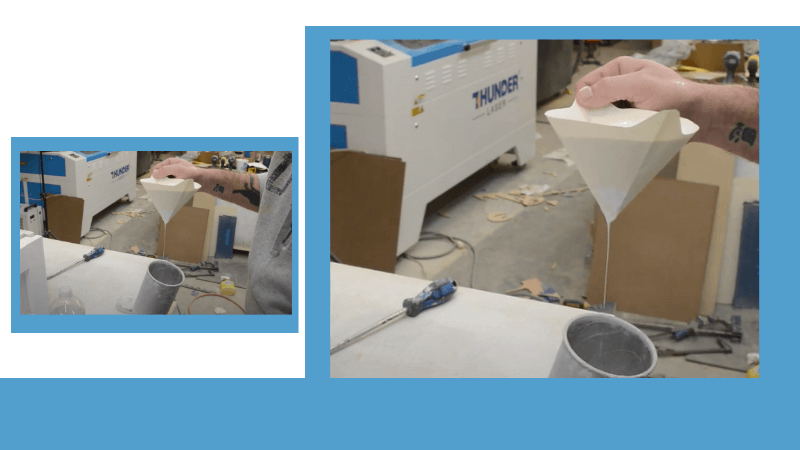
Step 3: Straining the Paint – Ensuring a Smooth Application
To ensure a smooth and even application, it is recommended to strain the thinned Emerald Urethane Trim Enamel. This step helps remove any impurities or particles that could potentially clog the spray gun. You have two options for straining:
a) Pre-Straining:
Place a filter or mesh over the container with the water and strain the paint before mixing. This is particularly useful if you want to ensure the paint is free from any debris or contaminants before further thinning or application.
b) Post-Mixing Straining:
If you trust the cleanliness of your container and want to streamline the process, you can choose to strain the mixture after mixing the paint and water. This approach allows you to strain the thinned Emerald Urethane Trim Enamel through a filter or mesh as you pour it into the spray gun cup.
Step 4: Thorough Mixing – Ensuring Proper Blend
Once you have combined the paint and water, it’s crucial to stir the mixture thoroughly for about 3 minutes. Take your time during this step to ensure the components are properly blended. Avoid rushing, as it may take some time for the mixture to achieve a complete blend. Stirring thoroughly guarantees a homogeneous consistency, allowing for an even application of the Emerald Urethane Trim Enamel.
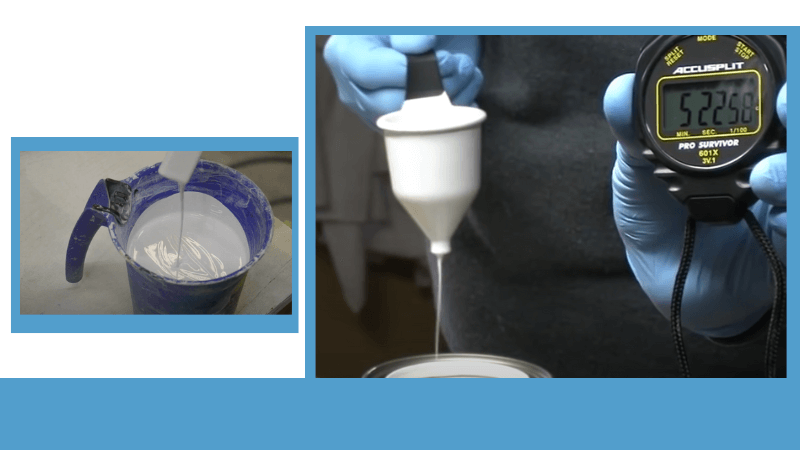
Step 5: Test the consistency
To check the consistency, dip a viscosity cup into the mixture and slowly lift it out. Observe the flow rate of the paint. If it flows too quickly or appears too thin, you may need to add more Emerald Urethane Trim Enamel. Conversely, if it flows too slowly or appears too thick, you may need to add a small amount of water.
Step 7: Adjust the spray gun
Follow the manufacturer’s instructions for your specific spray gun model to adjust the settings accordingly. This includes adjusting the air pressure, spray pattern, and flow rate to achieve the desired spray consistency.
Step 8: Practice and test
Before spraying the Emerald Urethane Trim Enamel on your target surface, it is recommended to practice on a test surface or scrap material. This allows you to familiarize yourself with the spray pattern and adjust the settings if needed.
Conclusion
In conclusion, by following the recommended thinning guidelines and using distilled water, you can achieve optimal spraying consistency for Emerald Urethane Trim Enamel. Thinning allows for better application and smoother results. Remember to refer to the manufacturer’s instructions for specific thinning ratios and always practice on a test surface before tackling your main project. With patience and precision, you’ll achieve professional-looking results when spraying Emerald Urethane Trim Enamel. Happy painting!