Staining wood can significantly transform its appearance, adding color and character to the surface. While shoe polish is not typically intended for wood staining, it can be employed as a makeshift stain for small projects or decorative purposes. This article will guide you through the process of staining wood using shoe polish, offering step-by-step instructions and helpful tips.
Step-by-Step Guide to Staining Wood with Shoe Polish
1. Prepare the Wood Surface
Before applying shoe polish, it’s crucial to prepare the wood surface adequately. Begin by sanding the wood to achieve a smooth and even texture. This step helps in removing any existing finishes or coatings, ensuring proper adhesion of the shoe polish.
2. Clean the Wood
Thoroughly clean the wood surface using a soft cloth or brush to eliminate any dust or debris. This preparatory step guarantees a clean and uniform application of the shoe polish, resulting in a more desirable outcome.
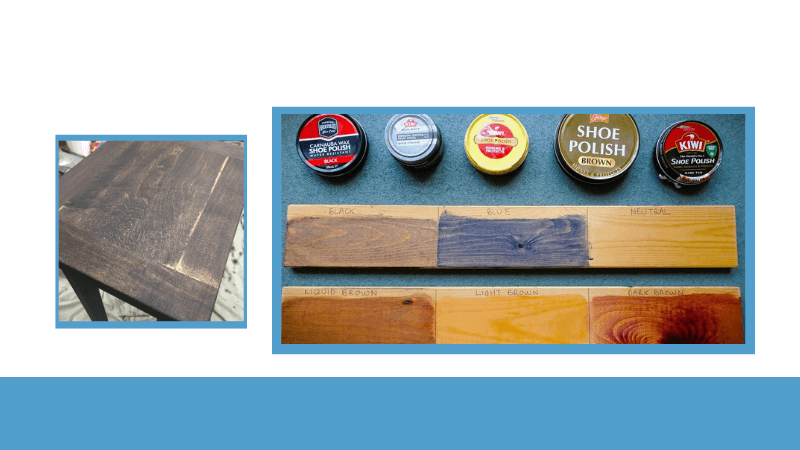
3. Choose the Shoe Polish
Select a shoe polish color that suits your staining requirements. Keep in mind that darker shades of shoe polish tend to provide a more intense and pronounced color on the wood. Consider testing the chosen polish on a small, inconspicuous area of the wood to ensure it meets your desired expectations.
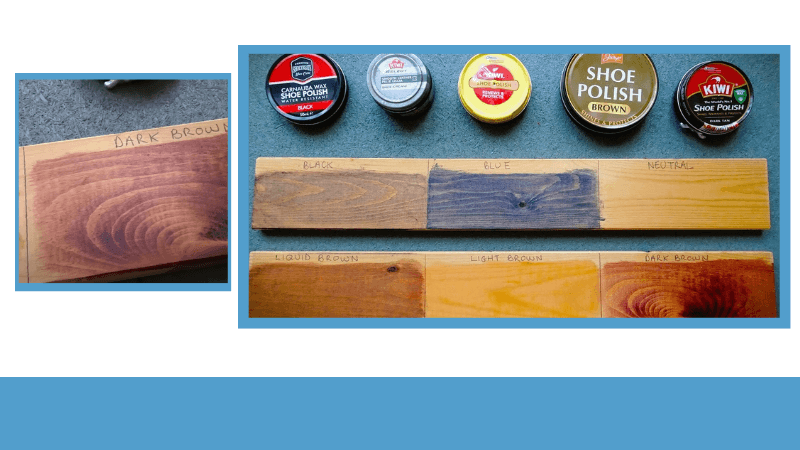
4. Test on a Small Area
Before proceeding to stain the entire wood surface, perform a test application on a small area. This allows you to assess the color and effect of the shoe polish stain. If satisfied, you can proceed confidently with the rest of the project.
5. Apply the Shoe Polish
Using a clean cloth or sponge, apply a small amount of shoe polish to the wood surface. Begin working in small sections, gently rubbing the shoe polish into the wood using circular motions. Ensure that the application is even and consistent throughout the surface.
6. Wipe off Excess
After applying the shoe polish, utilize a clean cloth to wipe off any excess polish from the wood surface. This step prevents the finish from becoming sticky or greasy and promotes a more desirable end result.
7. Allow Drying and Curing
Allow the shoe polish to dry and cure on the wood surface. The drying time may vary depending on the brand of shoe polish used. Refer to the manufacturer’s instructions for the recommended drying time. Patience during this stage ensures a well-set color and finish.
8. Apply a Protective Finish (Optional)
For added protection and durability, consider applying a clear protective finish such as varnish, shellac, or polyurethane. This step seals the stained wood surface, safeguarding the color and enhancing its longevity.
Can You Stain Wood with Boot Polish?
Boot Polish vs. Shoe Polish
Boot polish, similar to shoe polish, contains waxes and pigments that can add color to various surfaces. However, it’s important to note that boot polish is typically formulated for leather and may have slightly different compositions compared to shoe polish. When considering staining wood with boot polish, it’s essential to understand the potential differences in results and application.
Staining Wood with Boot Polish
When using boot polish to stain wood, you may experience similar outcomes as with shoe polish. The polish tends to sit on the wood surface and may not deeply penetrate the wood fibers like traditional wood stains. Consequently, the resulting coloration might be more superficial, lacking the ability to accentuate the wood grain or provide the same level of depth as penetrating stains.
The Appeal of Shoe Dye
If you desire vibrant colors or specific shades like black or red, shoe dye can be an excellent alternative. Shoe dyes are specifically formulated to penetrate leather but can also work effectively on wood surfaces. They tend to provide more intense and even coloration while still allowing the natural wood grain to show through.
Testing and Precautions
Before applying boot polish or shoe dye to your wood project, it’s crucial to conduct a test on a small, inconspicuous area. This test will help you assess the color and effect of the product on your specific wood type and determine if it meets your desired outcome.
Additionally, it’s important to exercise caution and follow the manufacturer’s instructions when working with boot polish or shoe dye. Different brands and formulations may have specific application requirements, so it’s advisable to read and adhere to the provided guidelines for the best results.
Conclusion: Staining Wood with Shoe Polish
Staining wood with shoe polish offers a creative and affordable method to beautify wood surfaces. While shoe polish is not specifically designed for wood staining, it can be successfully used for smaller projects or decorative items. By following the step-by-step guide provided in this article, you can achieve impressive results and enjoy the unique and distinct character that shoe polish imparts to wood. Remember to test the shoe polish on a small area first, exercise caution, and have fun exploring this alternative wood staining technique.