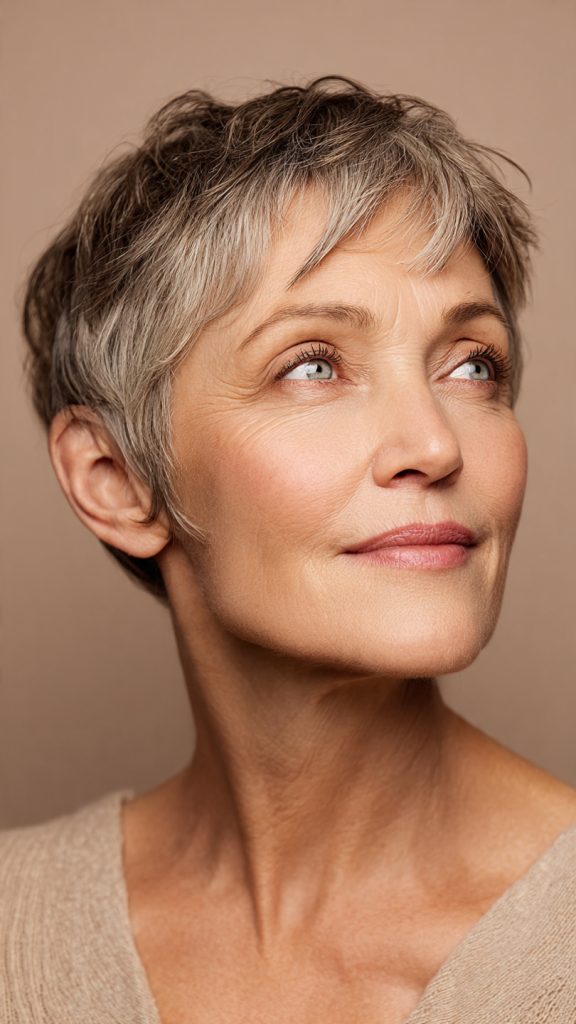
Turning 50 isn’t about stepping back from style; it’s about stepping into a new era of confidence. If there’s one haircut that embodies this spirit perfectly, it’s the pixie. But the modern pixie isn’t one-size-fits-all. The secret to a truly flattering short cut for women over 50 lies in the under-pixie—a technique where the interior layers are kept short and tight (often shorn or heavily tapered) while the top and front retain length, texture, and movement.
Why does this work so well? The “under” element removes bulk, making fine hair appear thicker and thick hair more manageable. It lifts the face, highlights the jawline, and drastically reduces styling time.
Below are 10 distinct under-pixie variations that celebrate volume, ease, and elegance:
1. The Tapered Nape Undercut
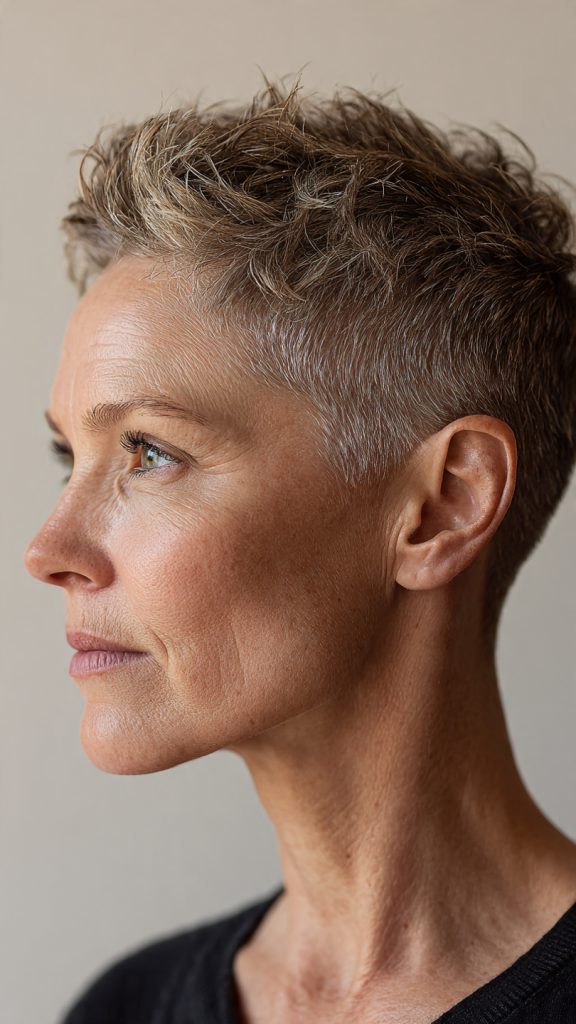
This is the classic entry point. The hair is clipped very close (often to a #2 or #3 guard) from the occipital bone down to the nape of the neck.
- Why it works: It eliminates the dreaded “helmet head” and the frizzy neck curl. When you look in a mirror, you see a clean, sharp line that elongates the neck.
- Styling: Leave the top long enough to sweep to the side. A dab of pomade on the ends creates a polished, clean finish.
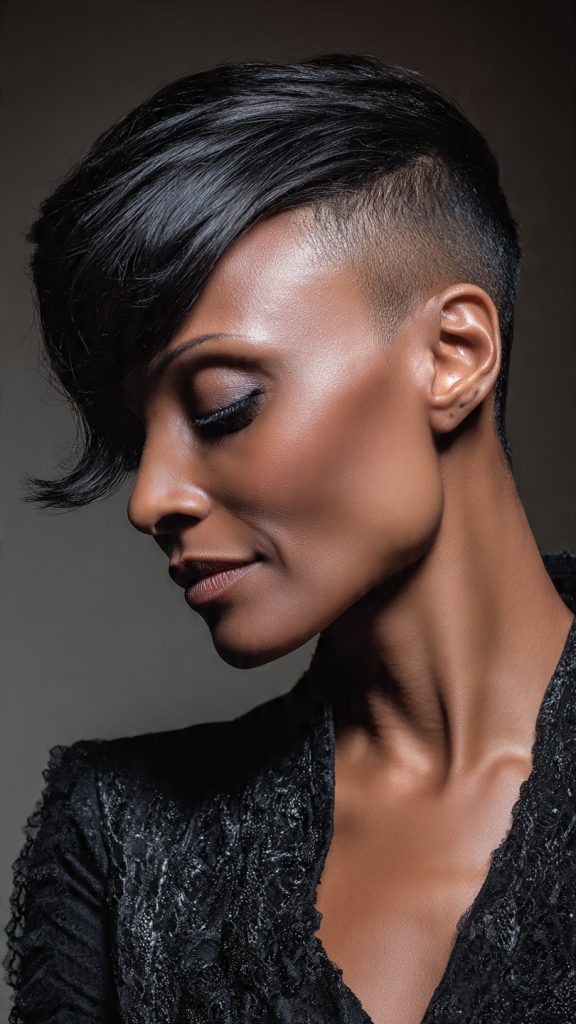
2. The Textured Crop with Disconnected Sides
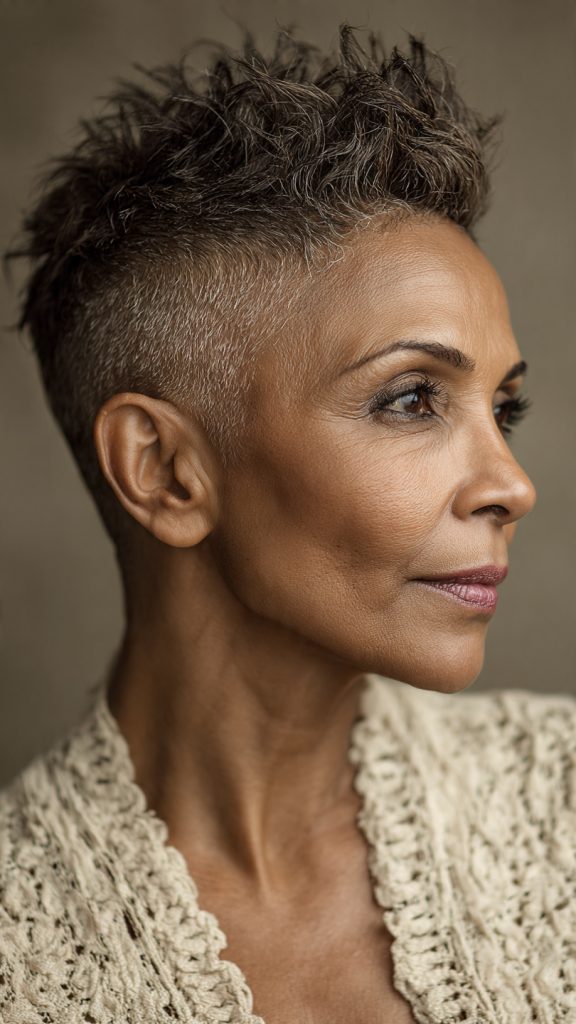
“Disconnected” means the sides are shorn ultra-short (undercut), but there is no gradual blend into the top. It creates a distinct line of contrast.
- Why it works: For women with strong bone structure or glasses, this graphic contrast draws the eye upward to the eyes and cheekbones.
- Styling: Use a dry wax spray on the longer top pieces to create a piece-y, modern separation that softens the hard line of the undercut.
3. The Silver Sweep with Shorn Temple

This style embraces grey or white hair by keeping the temple area on one side tightly undercut (think a “side shave” but only behind the ear).
- Why it works: Grey hair can often be wiry; removing bulk at the temples prevents that “wing” effect. The hidden undercut adds edge without looking juvenile.
- Styling: Sweep the silver top across the forehead like a soft wave. The contrast between the soft sweep and the tight temple is stunning.
4. The Curly Under-Pixie
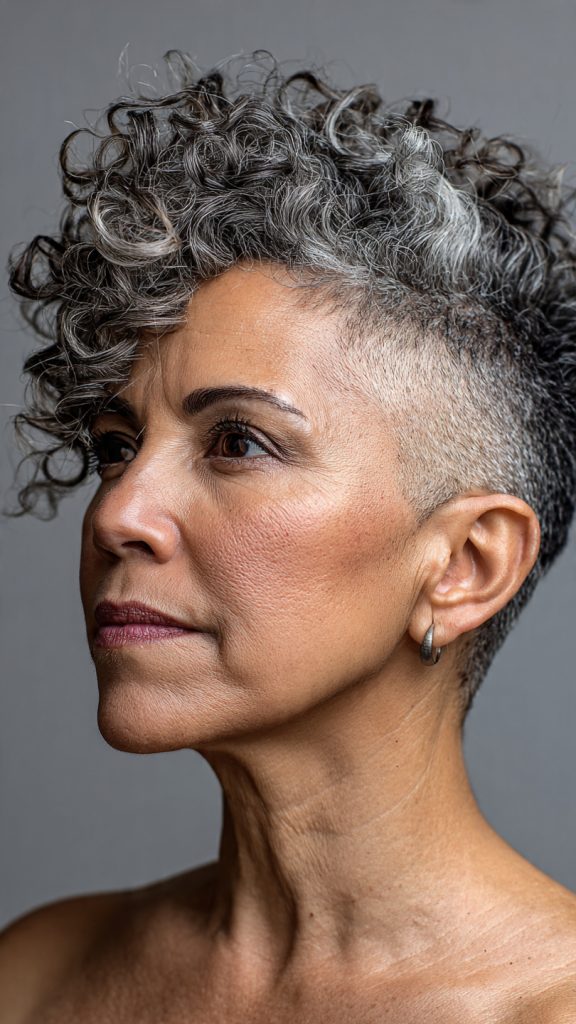
Many women think curly hair must be long to be controlled. False. This cut keeps the curls long on the crown but shaves the under layer at the back and sides completely.
- Why it works: It removes the “triangle” shape that curls often get. The curls sit on top of the undercut, creating a beautiful, round silhouette.
- Styling: Scrunch in a curl cream while wet and diffuse upside down. The undercut means zero frizz at the neckline.
5. The Asymmetric Undercut
One side of the head is cut into a traditional pixie shape, while the other side is shorn into a deep undercut that might extend slightly above the ear.
- Why it works: It adds a modern, artistic flair that distracts from any signs of aging (like fine lines on one side of the face). It signals confidence.
- Styling: Keep the long side sleek with a flat iron, or add a deep side part that completely covers the undercut for a day look—then reveal it at night.
6. The Wispy Fringe with Hollowed-Out Back
Instead of a blunt cut, this uses an undercut technique to hollow out the dense hair at the crown, leaving only a “cap” of wispy, light hair.
- Why it works: For women experiencing age-related thinning at the crown, hollowing out the bottom removes weight that pulls the hair down, creating instant lift.
- Styling: Blow-dry the wispy fringe forward using a small round brush. It creates a soft, feathered frame around the forehead.
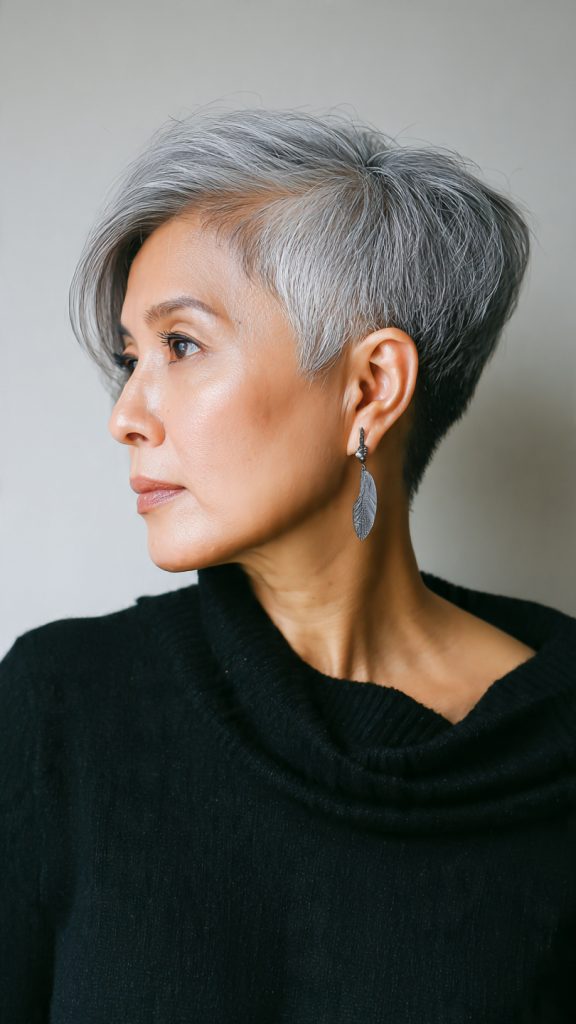
7. The Sleek Deep Side Part
Length is kept on top (2-3 inches) and swept dramatically to one side, while the entire opposite side and back are kept in a tight, clipper-short undercut.
- Why it works: The dramatic volume on top balances a softening jawline. It is incredibly sophisticated for the office or formal events.
- Styling: Use a flat iron to make the long top piece glass-smooth. Apply a high-shine serum to emphasize the sleekness over the matte undercut.
8. The Choppy Pixie with Exposed Ears

Most standard pixies cover the ears. This under-pixie shaves the hair above the ear so the ear is fully exposed.
- Why it works: Exposing the ears is instantly lifting. It also allows you to show off statement earrings, which are a 50+ woman’s best accessory.
- Styling: Keep the top choppy and textured using a salt spray. Run a razor comb through the ends to keep them sharp, not blunt.
9. The Soft Mullet (Modern Shag Pixie)

Yes, the mullet is back, but for 50+, it is refined. This features a short, undercut back (classic mullet shape) but a softer, longer pixie top and side burns.
- Why it works: It retains length around the face to soften wrinkles but removes 80% of the bulk from the back, making it incredibly low-maintenance.
- Styling: Let it air dry naturally. A little sea salt spray on the ends enhances the “lived-in” rock-and-roll texture.
10. The Sculpted Finger Wave Undercut
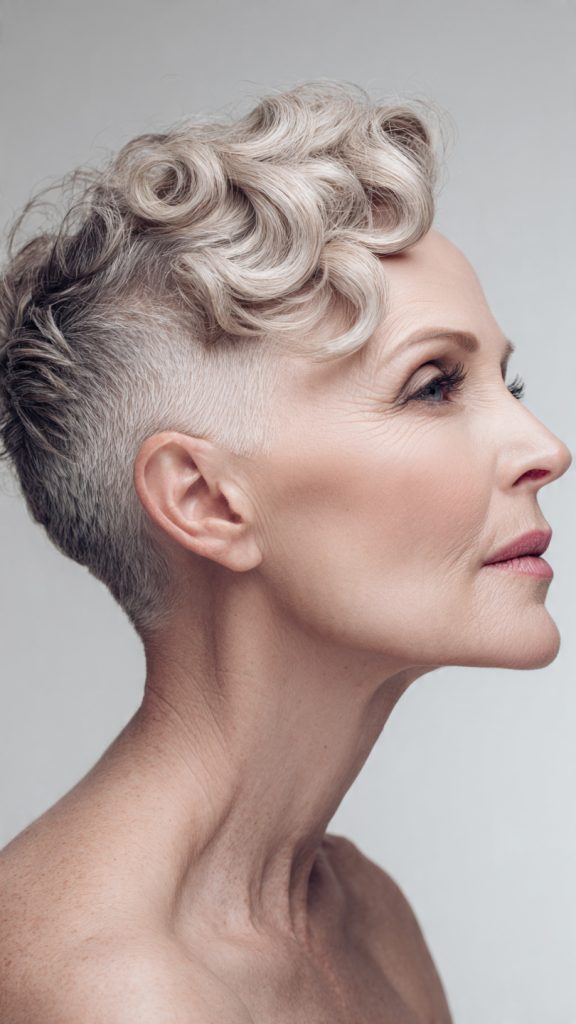
This is for the glamorous woman. The sides and back are kept in a deep undercut, but the longer top is styled into vintage finger waves.
- Why it works: The contrast between the vintage top and the modern, edgy undercut is unique and elegant. The undercut ensures the waves don’t make you look “dated.”
- Styling: Use a strong hold gel and metal clips to set the waves while drying. Once dry, brush out for a satin finish.
Why the Under-Pixie Works So Well After 50
Before we dive into styling and maintenance, let’s talk about the “why.” Many women over 50 are told to simply cut their hair short without understanding how short haircuts can go wrong. The under-pixie solves three specific age-related hair challenges:
- Volume loss – As estrogen levels drop, hair often becomes finer. The under-pixie removes weight from the bottom, allowing the top to lift naturally.
- Texture changes – Grey and white hair can become coarse, wiry, or frizzy. By shaving the underside, you eliminate the unruly “poof” that often appears at the nape and sides.
- Heat damage – Less hair means less blow-drying, flat-ironing, and product buildup. Your hair gets a break.
The result? A cut that works with your changing hair, not against it.
How to Communicate with Your Stylist
Walking into a salon asking for an “under-pixie” can lead to confusion if you don’t use the right language. Here is exactly what to say:
| Instead of this | Say this |
|---|---|
| “Cut it short in the back” | “I want a tapered undercut from my occipital bone down to the nape.” |
| “Make it edgy” | “I want disconnected sides with a longer top. No blending.” |
| “Take some weight out” | “Hollow out the underside but keep the top length.” |
| “I don’t like the neck fuzz” | “Shave the nape clean to a #2 guard or lower.” |
Pro tip: Bring a reference photo. The prompts you just used for AI images are perfect to show your stylist. Save your favorite generated image to your phone.
Styling an Under-Pixie in Under 10 Minutes
One of the greatest advantages of this haircut is speed. Here is a simple three-step routine for any of the 10 styles above:
Step 1: Dampen and product (2 minutes)
Spray your hair with water until slightly damp. For fine hair, use a volumizing mousse at the roots. For thick or curly hair, use a lightweight cream or gel.
Step 2: Dry strategically (5 minutes)
Flip your head upside down and blow-dry using only your fingers. The undercut areas will dry in seconds. Focus heat on the longer top section. For extra lift, use a small round brush just at the roots.
Step 3: Finish and go (2 minutes)
Rub a pea-sized amount of pomade, wax, or texture paste between your palms. Run your fingers through the top pieces only. Avoid the shorn sides and nape—they need no product.
That’s it. No curling irons. No complex braiding. No 45-minute blowouts.
Maintenance Schedule: How Often to Visit the Salon
The under-pixie is low-maintenance daily but requires regular salon visits to keep the undercut shape crisp. Here is a realistic timeline:
| What | How often | Why |
|---|---|---|
| Full cut (top and undercut) | Every 4–6 weeks | The top grows slower; the undercut grows fast and loses its clean shape |
| Just the undercut touch-up | Every 2–3 weeks (optional DIY or barber) | If you want to save money, a barber can shave just the nape and sides for $10–$15 |
| At-home nape shaving | Not recommended | It’s difficult to see the back of your own head; let a pro handle it |
Cost expectation: A full under-pixie cut at a mid-range salon typically costs $50–$90. A barber-only undercut refresh (no top cutting) costs $15–$25.
Product Recommendations for Each Hair Type
Not all under-pixies use the same products. Here is a quick guide based on your texture:
For fine, thinning hair (White women often):
- Product: Volumizing powder or dry texture spray
- Apply: At the roots of the longer top section only
- Avoid: Heavy oils or butters—they will flatten the cut
For coily, curly hair (Black women often):
- Product: Lightweight curl cream or whipped butter
- Apply: Scrunch into the curly top while soaking wet
- Avoid: Alcohol-based sprays—they cause dryness and shrinkage
For thick, wavy hair (Latina, Middle Eastern women often):
- Product: Anti-humidity smoothing serum
- Apply: Run through the top section before blow-drying
- Avoid: Heavy waxes—they will make thick hair look greasy
For straight, dense hair (Asian women often):
- Product: Lightweight texturizing paste
- Apply: Rub between palms and twist ends for piece-y definition
- Avoid: Gels that create a wet, “helmet” look
What to Avoid with an Under-Pixie
Even a great haircut can go wrong with bad habits. Steer clear of these common mistakes:
- Over-washing – Shorter hair needs less shampoo. Wash 2–3 times per week maximum. Use dry shampoo in between.
- Skipping sunscreen – The exposed nape and ears are now vulnerable to sunburn. Use a spray SPF or wear a hat.
- Using too much product – A pea-sized amount is plenty. More product will weigh down the top and make the undercut look greasy.
- Letting the nape grow too long – That fuzzy line at the back ages you instantly. Book your touch-up before you see it.
- Choosing a style that fights your natural texture – If you have tight curls, don’t fight them with a sleek, straight pixie. Work with what grows out of your head.
Real Talk: Will an Under-Pixie Suit My Face Shape?
This is the most common concern. Here is a simple guide:
| Face shape | Best under-pixie style | What to avoid |
|---|---|---|
| Round | Asymmetric undercut (#5) or Sleek deep side part (#7) – adds vertical length | Round, blunt shapes that mirror the face |
| Oval | Anything works – try Textured crop (#2) or Soft mullet (#9) | Nothing – oval faces are versatile |
| Square | Wispy fringe (#6) or Silver sweep (#3) – softens a strong jaw | Severe, boxy cuts with hard lines |
| Heart | Tapered nape (#1) or Choppy exposed ears (#8) – balances a narrow chin | Heavy, dense tops that widen the forehead |
| Long/Oblong | Curly under-pixie (#4) or Finger waves (#10) – adds width | Tall, high-volume styles that elongate further |
Still unsure? Ask your stylist for a “digital try-on” or use a free virtual hairstyle app before committing.
Conclusion: The Under-Pixie Is Not a Compromise—It’s an Upgrade
For decades, women over 50 have been handed a short list of “acceptable” haircuts: the helmet bob, the frizzy perm, the shapeless crop. These cuts whisper, “You’re done being noticed.”
The under-pixie says the opposite.
This is not a haircut of surrender. It is a haircut of intention. By keeping the underside tight and the top expressive, you get the best of both worlds: the ease of short hair and the artistry of long hair. You wake up with shape. You walk out the door with confidence. You spend less time in front of the mirror and more time living.
Whether you choose the dramatic asymmetry of an undercut, the soft romance of finger waves, or the playful texture of a curly crop, the under-pixie adapts to you—not the other way around.
Your best haircut is waiting for you. Go get it.