The satisfaction of completing a woodworking project can be indescribable. There’s nothing quite like admiring a well-crafted piece of furniture, knowing that you created it with your own hands. However, the journey to get there can be filled with frustration, especially when it comes to applying a wipe on a poly finish. The online woodworking community is filled with tales of woe; streaks, raised patches, dull areas, and tacky surfaces. These are just a few of the common problems that woodworkers face when trying to achieve a flawless finish with wipe-on poly.

In this article, we’ll explore these issues and offer some solutions to help you achieve the perfect finish on your next woodworking project. So, let’s dive in and figure out how to avoid these wipe-on poly problems once and for all.
Recommended Article
Polyurethane Vs Varnish: are they the same?
Problem 1: Uneven application
Wipe-on poly is a popular finish for woodworkers due to its fast re-coat times. However, one of the biggest challenges with this finish is achieving an even surface. Applying wipe-on poly may seem easy at first – simply wipe it onto the wood with a rag. But in reality, it requires careful attention to ensure even application.
A simple fix
One technique is to place a lamp on one side to reveal any inconsistencies in the finish. To avoid an uneven surface, it’s important to apply thin layers and gradually build up the thickness with subsequent coats.
Problem 2: Drying issues
Uneven drying is a common problem when repairing parts of finished furniture with patches of bare wood exposed. After a light sanding and applying wipe-on poly, you may notice some patches that won’t dry like the rest of the table. This can be frustrating, but it’s easy to fix.
A simple fix
All you need to do is wait a little longer before applying another coat. To avoid this problem, you can either remove the entire finish and start fresh or apply the wipe-on poly on the patches first, let it dry, lightly sand, and then apply the first coat to the entire surface.
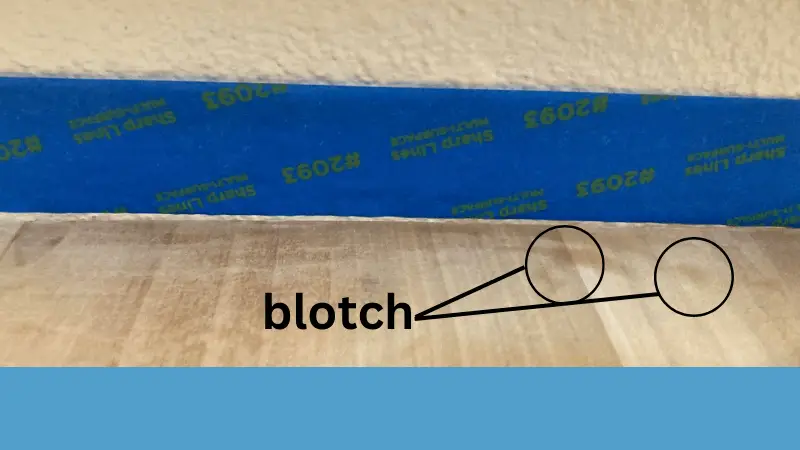
Problem 3: White spots or haze
Another common problem with wipe-on poly is the appearance of white spots or a haze on the surface of the wood. This can occur if the finish wasn’t mixed well enough or if it was applied in a humid environment.
How to fix it
To fix this issue, you can try gently rubbing the affected area with a soft cloth and a small amount of mineral spirits. If the problem persists, you may need to sand down the affected area and reapply the finish.
Problem 4: Tacky or sticky finish
One of the most frustrating problems when working with wipe-on poly is a tacky or sticky finish. This can happen when the finish hasn’t fully cured or when the humidity is high.
Fixing tackiness after wiping poly
To fix this issue, you can wait longer for the finish to dry and cure before touching the surface. You can also try moving the piece to a less humid environment or using a dehumidifier in your workspace. If the finish is still tacky after a few days, you may need to remove it and start over.
Problem 5: Yellowing
Over time, wipe-on poly finishes can yellow or darken, which can be particularly noticeable on light-colored wood.
A simple fix
To prevent yellowing, use a water-based polyurethane finish instead of an oil-based one. Water-based finishes are less likely to yellow over time and can help preserve the natural color of the wood. Additionally, avoid exposing the finished piece to direct sunlight, as this can accelerate yellowing.
Key takeaways: Wipe on poly problems
- Applying wipe-on poly requires careful attention to ensure an even surface.
- Thin layers should be applied and gradually built up to avoid an uneven surface.
- Uneven drying can be fixed by waiting longer before applying another coat.
- White spots or haze can be fixed by gently rubbing the affected area with a soft cloth and a small amount of mineral spirits or sanding down the affected area and reapplying the finish.
- Tacky or sticky finish can be fixed by waiting longer for the finish to dry and cure before touching the surface, moving the piece to a less humid environment, or using a dehumidifier in your workspace.
- To prevent yellowing, use a water-based polyurethane finish instead of an oil-based one and avoid exposing the finished piece to direct sunlight