Not every Halloween carving has to be cute. Smiling ghosts and cheerful pumpkins have their place, but sometimes you want a piece that makes guests look twice when they walk past the bookshelf. This collection leans into the creepy side of the season, with hooded reapers, clawing zombie hands, beaked plague doctors, and shadows that crawl across the walls.
Most of these projects still start from a humble block of basswood, and none of them require advanced skills. A few are a step up from beginner work, though, so if you’ve never picked up a carving knife before, you may want to warm up with our 20 Simple Halloween Carving Ideas first. Once you’ve got a ghost or two under your belt, come back here and let things get a little darker.
What You’ll Need
A sharp carving knife and a cut-resistant glove will handle a lot of the work, but spooky carvings rely heavily on shadow and depth, so a V-tool and one or two small round gouges will make a noticeable difference. You’ll also want a few larger basswood blanks, such as 2″ x 2″ x 4″ and 2″ x 2″ x 6″, since several of these figures are taller or chunkier than typical beginner pieces.
Check out our beginner’s guide to choosing your first whittling kit.
A drill with a few small bits and a Forstner bit comes in handy for eyes, sockets, and hollowing, while a coping saw or scroll saw is needed for the flat cut-out projects. For finishing, keep black, burnt umber, and a few grays on hand. As you’ll see in the finishing tips at the end, dark washes and dry brushing do much of the heavy lifting in making a carving look genuinely eerie.
20 Spooky Halloween Carving Ideas
1. Skeleton Key
Unlock the Door to Every Haunted Room
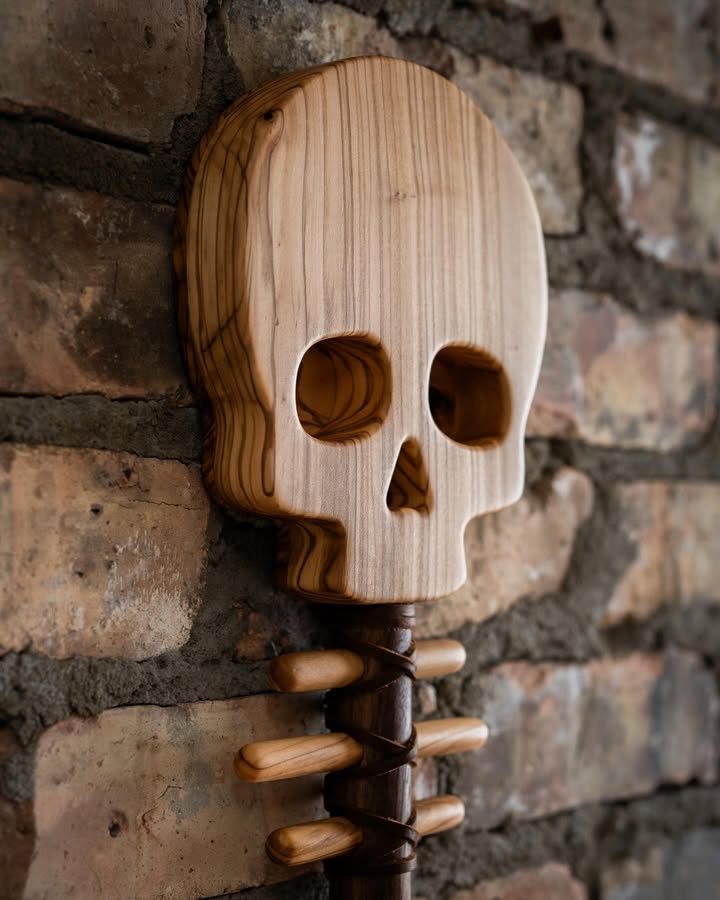
There’s something unsettling about an old key with no lock to go with it. Draw a key shape on a piece of basswood about 3/8″ thick, with an ornate ring at the top, a long shank, and a toothy bit at the end. Cut out the outline with a coping saw, then use your knife to round the shank and soften the edges.
For extra creep factor, carve the ring into a small skull or a pair of bat wings. Paint the key black, then dry-brush it with bronze or rusty orange so it looks like it’s been sitting in a crypt for a century. Hang several on a board labeled “Do Not Open” for a great conversation piece.
Blank: 3/8″-thick basswood, about 2″ x 6″ · Time: 1 to 2 hours
2. Zombie Hand Rising from the Grave
Something Is Clawing Its Way Out
This one gets a reaction every single time. Use a 2″ x 2″ x 4″ blank with the grain running vertically, so the fingers follow the grain and are less likely to snap. Reserve the bottom inch for a mound of cracked earth, then carve the hand bursting upward from it, with fingers bent and reaching.
Leave the fingers a little thicker than feels right at first, and only thin them once the overall shape is done. Paint the hand a sickly gray-green, the earth a dark brown, and push a black wash into the knuckle creases and ground cracks to make it look freshly unearthed.
Blank: 2″ x 2″ x 4″ basswood · Time: 2 to 3 hours
3. Peeping Eyes in the Wood
Something in the Woodpile Is Watching You
This is one of the easiest projects on the list, but it has one of the biggest payoffs. Take a scrap plank or log slice and carve a jagged crack or knothole into the surface using deep V-cuts. Hollow out the inside with a small gouge, leaving two tiny rounded domes near the back for the eyes.
Paint the hollow pitch black and give the eyes a yellow or red color with thin slit pupils. Hang it on a fence post, tuck it among the firewood, or prop it in a dark corner, and wait for someone to notice they’re being watched.
Blank: scrap plank or log slice · Time: about 1 hour
4. Screaming Specter
The Ghost That Didn’t Come in Peace
Forget the friendly bedsheet ghost. This specter is tall, stretched, and mid-wail. Use a 1.5″ x 1.5″ x 6″ blank and carve an elongated figure with its head tilted back and a long oval mouth open in a silent scream. A small round gouge works well for hollowing out the eyes and mouth as deeply as the wood allows.
Carve the lower half into a tattered, twisting hem, as if the figure is caught in a gust of wind. Paint it white, then brush on a gray wash so the shadows gather in the eyes and mouth, giving it that hollow, haunted stare.
Blank: 1.5″ x 1.5″ x 6″ basswood · Time: about 2 hours
5. Death’s-Head Moth
Nature’s Own Skull and Crossbones
The death’s-head hawkmoth gets its name from the skull-shaped marking on its back, which makes it one of nature’s spookiest creatures. Draw a moth with its wings spread on a basswood panel, then make stop cuts around the outline and lower the background with a gouge so the moth stands out in relief.
Gently dome the body and wings, then use the tip of your knife to incise the skull pattern on the moth’s back. Paint the wings in dusty browns and blacks, the body in yellow and black bands, and the skull a pale cream. Framed like an old museum specimen, it looks right at home in a gothic display.
Blank: 3/4″-thick basswood panel, about 4″ x 6″ · Time: 2 to 3 hours
6. Spirit Board Planchette
Ask the Spirits What to Carve Next
The planchette is the little teardrop-shaped pointer that glides across a talking board, and it makes a wonderfully eerie carving. Cut a teardrop shape from 1/2″-thick basswood, then drill a round viewing window toward the pointed end with a Forstner bit. Round over all the edges so it feels smooth in the hand.
Carve crescent moons, stars, or an all-seeing eye around the window, and glue three small felt pads underneath so it slides across a table. A dark stain with a touch of gold dry brushing gives it an antique, heirloom look that’s perfect for a séance-themed party.
Blank: 1/2″-thick basswood, about 3″ x 4″ · Time: 1 to 2 hours
Also dont miss out on these effortless whittling ideas for weekends.
7. Plague Rat
The Uninvited Guest Hiding in the Pantry
A hunched little rat is quick to carve and wonderfully creepy when tucked into unexpected places. Draw the side profile on a 1″ x 1″ x 3″ blank, with an arched spine, pointed snout, and small rounded ears. Carve away the waste, then use short V-tool strokes to suggest fur along the back.
Don’t try to carve the tail from the same block, since a thin wooden tail will almost certainly snap. Instead, drill a small hole and glue in a length of leather cord or bendable wire. Paint it a grubby gray-brown with beady red eyes, make a few, and hide them around the house.
Blank: 1″ x 1″ x 3″ basswood · Time: 1 to 2 hours
8. Raven Skull
A Gothic Curiosity Straight from the Apothecary Cabinet
Bird skulls are a staple of dark, gothic decor, and a raven skull is a surprisingly achievable carving. Draw the side profile on a 1″ x 1″ x 4″ blank, with a rounded cranium, an oversized eye socket, and a long, heavy beak. Carve out the profile first, then narrow the beak when viewed from above.
Use a small gouge to hollow the eye sockets deeply, and add a thin nostril slit along the top of the beak. Finish it in a bone color with a brown antique wash to settle into the recesses. Displayed under a glass dome, it looks like something from a Victorian collector’s shelf.
Blank: 1″ x 1″ x 4″ basswood · Time: about 2 hours
9. Glowing Wooden Jack-O’-Lantern
A Wicked Grin with a Light Inside
This pumpkin actually glows. Start with a 3″ x 3″ x 3″ block and round it into a pumpkin shape with deep ribs carved in using a V-tool. Just like a real pumpkin, saw off the top as a lid, then hollow out the inside with a drill and gouges, leaving the walls about 1/4″ thick.
Draw a jagged, snaggle-toothed grin and angry eyes, drill starter holes, and cut the openings all the way through with your knife. Paint it orange with a dark wash in the ribs, drop an LED tealight inside, and put the lid back on. Always use battery-powered lights here, never a real flame.
Blank: 3″ x 3″ x 3″ basswood · Time: an afternoon
10. Coffin Trinket Box
Small Enough for Treasures, Creepy Enough for Secrets
A tiny coffin box is spooky and useful at the same time. Draw the classic six-sided coffin shape on top of a 2″ x 3″ x 5″ block, cut it out, then saw off the top 3/8″ to use as a lid. Hollow out the base with a drill and gouges, leaving walls around 1/4″ thick.
Glue a thin strip of wood inside the rim so the lid seats neatly, or inset two small magnets to hold it shut. Carve a skull, a bat, or “RIP” into the lid, then finish with a dark stain. It’s perfect for holding rings, candy, or a note for whoever dares to open it.
Blank: 2″ x 3″ x 5″ basswood · Time: an afternoon
11. Hooded Grim Reaper
No Face, No Mercy
The reaper’s scariest feature is the one you don’t carve: the face. Using a 1.5″ x 1.5″ x 6″ blank, round the top into a deep hood, then hollow out the inside with a small gouge to create a dark void where a face should be. Carve the rest of the body as a long robe with deep vertical folds.
Add a bony hand clutching a scythe made from a thin dowel, with the blade cut from a separate piece of thin wood and glued on. Paint the figure black, dry-brush dark gray along the robe folds, and keep the inside of the hood pure black so it seems to go on forever.
Blank: 1.5″ x 1.5″ x 6″ basswood · Time: about 3 hours
12. Plague Doctor
The Beaked Figure That Haunted Old Europe
Few historical figures are as unsettling as the beaked costume associated with 17th-century plague doctors. The long beak was said to be stuffed with aromatic herbs believed to protect against disease. Carve your figure from a 2″ x 2″ x 6″ blank, with a wide-brimmed hat, a long coat, and a cane in one hand.
The beak is the trickiest part, since a thin beak carved across the grain can break. Either keep it thick and angled slightly downward, or carve it separately and glue it on. Paint the figure black with a tan leather beak and two small silver or red circles for the glass eye lenses.
Blank: 2″ x 2″ x 6″ basswood · Time: about 3 hours
13. Sack-Masked Scarecrow
He Was Never Just Guarding the Corn
Scarecrows are only one bad mood away from being terrifying. Carve a figure from a 1.5″ x 1.5″ x 5″ blank, giving it a lumpy sack for a head, cinched at the neck with a V-cut ring and bunched folds. Incise stitched X-shaped eyes and a jagged, stitched mouth with the tip of your knife.
Top it with a floppy, droopy hat, and glue small bits of real broom straw into drilled holes at the sleeves and neck. For outstretched arms, glue a dowel crossbar behind the shoulders. Paint the head a burlap tan with a brown wash and give the shirt a faded, dirty plaid.
Blank: 1.5″ x 1.5″ x 5″ basswood · Time: 2 to 3 hours
14. Vampire with Fangs
Carve a Count Who Only Comes Out at Night
A vampire bust is a fantastic project for practicing faces. Using a 2″ x 2″ x 4″ blank, carve a sharp widow’s peak hairline, gaunt cheekbones, deep-set eyes, and a slightly open mouth. Behind the head, leave a tall, dramatic collar rising up, keeping it thick at the base so it doesn’t break.
The fangs can be carved as two tiny points or simply painted on in white. Give the face a pale gray-white color, the hair a slick black, and the inside of the collar a deep blood red. A touch of red around the lips completes the look.
Blank: 2″ x 2″ x 4″ basswood · Time: 2 to 3 hours
15. Crooked Old Witch
The One Who Lives at the End of the Lane
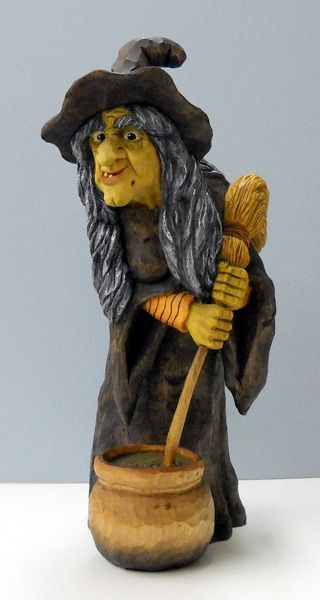
This is a caricature carving, which means exaggeration is the whole point. Use a 1.5″ x 1.5″ x 6″ blank and carve a hunched figure with a tall, bent hat, a long hooked nose, and a pointed chin that nearly meets it. Leave a few small bumps standing proud on the face for warts.
Carve gnarled hands clutching a shawl or a crooked walking stick. Don’t worry about symmetry, since the more lopsided she is, the better she looks. Paint her skin a pale green, her clothes in faded purples and blacks, and add a sharp little glint of white to her eyes.
Blank: 1.5″ x 1.5″ x 6″ basswood · Time: 2 to 3 hours
16. Snarling Werewolf
Full Moon, Bared Teeth, No Turning Back
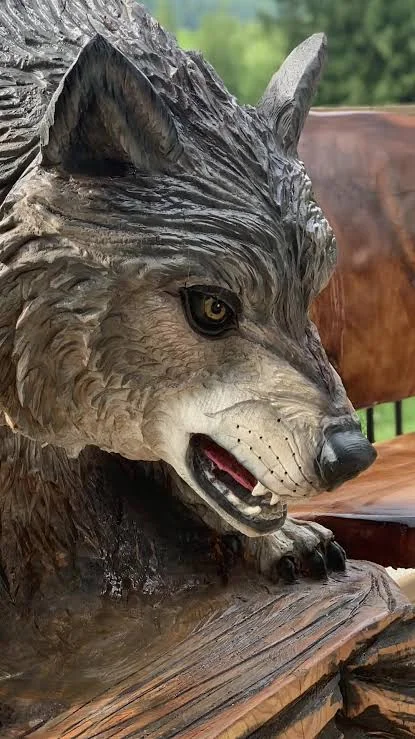
A werewolf head is all about the snarl. Lay a 2″ x 2″ x 4″ blank lengthwise so the grain runs along the muzzle, which will help protect it from breaking. Draw the side profile with the lips pulled back, a wrinkled snout, and ears laid flat against the head, keeping the ears thick for strength.
Carve the teeth with small V-cuts, leaving the fangs standing proud, then use long, flowing V-tool strokes to create fur sweeping back from the face. Paint it dark brown, dry-brush lighter tan on the fur tips, and give it a pair of bright yellow eyes.
Blank: 2″ x 2″ x 4″ basswood · Time: about 3 hours
17. Gargoyle
The Stone Guardian You Can Carve from Wood
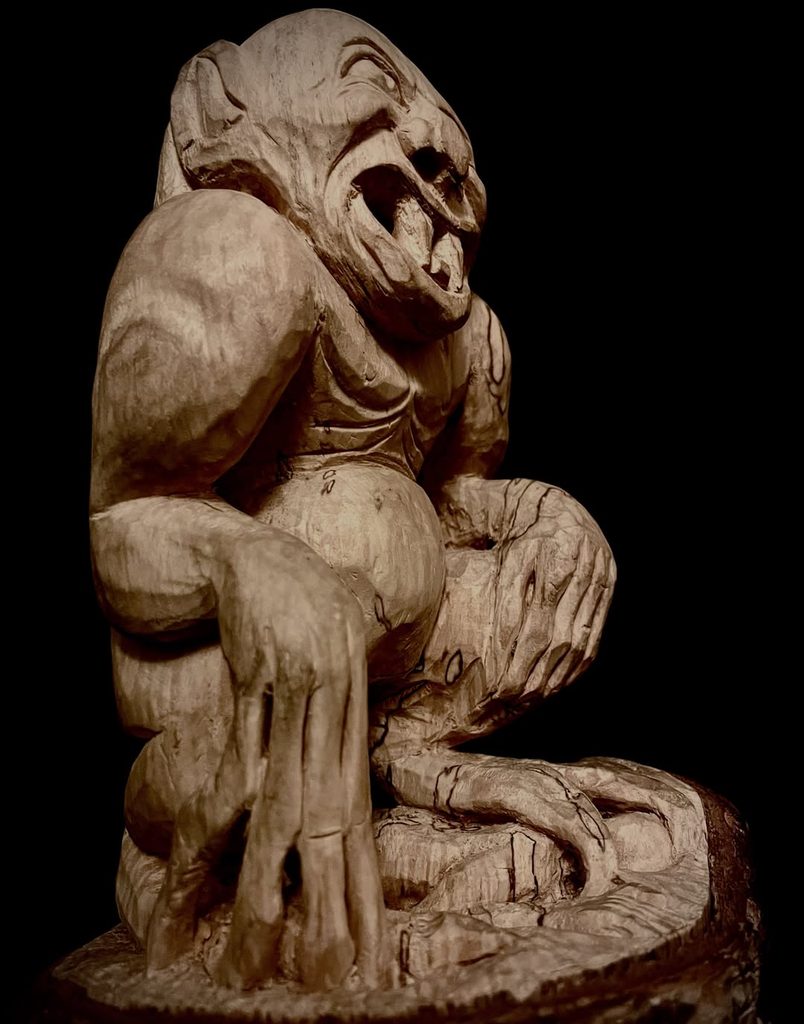
Here’s a fun fact: a true gargoyle is a carved waterspout, and the figures that don’t channel water are technically called grotesques. Either way, a crouching winged creature makes a brilliant spooky carving. Use a 2″ x 2″ x 4″ blank and carve a hunched figure with its elbows on its knees and its chin resting in its claws.
Add small horns, and carve folded bat wings in low relief across the back. To make it look like stone, paint it gray, dab lighter and darker grays over the top with a sponge, and push a black wash into every crevice. Perch it on the corner of a bookshelf to stand guard.
Blank: 2″ x 2″ x 4″ basswood · Time: about 3 hours
18. Tentacles from the Deep
Something Is Reaching Up from Below
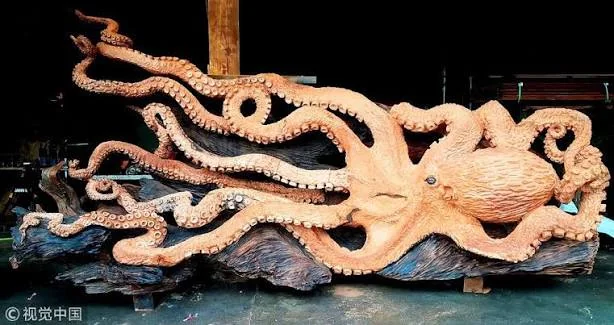
Tentacles bursting out of a block of wood create an instant sense of dread. Use a 2″ x 2″ x 5″ blank with the grain running vertically, and carve two or three tentacles twisting upward and curling at the tips. Carve the base to look like cracked floorboards or rippling water, as if something is breaking through.
Make the suckers along the underside of each tentacle with shallow dimples from a small drill bit or the tip of a round gouge. Paint the tentacles a deep purple or murky teal, fading to a paler shade on the suckers. A little gloss finish on just the tips gives them a wet, freshly surfaced look.
Blank: 2″ x 2″ x 5″ basswood · Time: 2 to 3 hours
19. Haunted House Relief Plaque
Every Street Has One House Nobody Visits
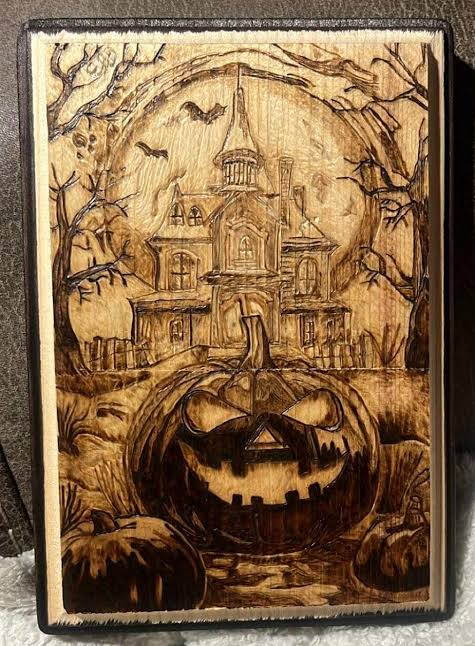
A relief plaque lets you build a whole spooky scene in one piece. On a 3/4″-thick panel around 6″ x 8″, draw a crooked old house on a hill with a dead tree, a full moon, and a few bats. Make stop cuts along the outlines, then lower the sky with gouges so the house and tree stand out.
Work in layers, with the house front highest, the tree in the middle, and the sky lowest. Carve crooked shutters, broken fence posts, and sagging rooflines. Paint the sky dark, the moon pale, and light just one window with glowing yellow, which is somehow far creepier than lighting them all.
Blank: 3/4″-thick basswood panel, about 6″ x 8″ · Time: a weekend
20. Shadow-Casting Graveyard Luminary
Light It Up and Let the Shadows Do the Haunting
This final project uses light to do the spooking. Cut four thin panels of basswood, about 1/4″ thick and 4″ x 6″, and draw graveyard silhouettes on each: tombstones, a twisted tree, flying bats, and a crescent moon. Drill a small starter hole inside each shape, thread your scroll saw blade through, and cut the shapes out.
Glue the panels into a box on a small base, paint the outside black, and place an LED tealight or puck light inside. Switch off the room lights and the silhouettes stretch across your walls and ceiling. As with any wooden lantern, stick to battery-powered lights only.
Blank: 1/4″-thick basswood sheets · Time: an afternoon
Finishing Tricks That Make Any Carving Creepier
The paint job often decides whether a carving looks spooky or just looks brown. The most useful trick is an antique wash: thin black or burnt umber acrylic with plenty of water, brush it over the whole piece, then immediately wipe the surface with a rag. The dark color stays trapped in every crack, crease, and eye socket, adding instant age and depth.
Dry brushing is the natural partner to a wash. Load a brush with a lighter color, wipe off almost all of it, then drag it lightly across the raised areas. It picks out fur, robe folds, and stone textures beautifully. For tombstones, coffins, and gargoyles, go further by deliberately denting edges and cutting small chips and cracks so the piece looks weathered.
Some carvers also give their work a very light pass with a small torch to darken the soft grain, then brush it with a brass brush for a scorched, ancient texture. If you try this, work outdoors away from anything flammable, keep water nearby, and practice on scrap first, because basswood chars quickly. Whatever finish you choose, keep the darkest parts truly black and seal with a matte finish, since glossy surfaces tend to make spooky pieces look like toys.
Build Your Own Haunted Collection
The beauty of spooky woodcarving is that each piece adds to a growing cast of characters. Carve a reaper this year and a gargoyle the next, and before long you’ll have a haunted shelf that comes out every October and gets creepier with each new addition. Pick the project that gives you the best kind of chill, sharpen your knife, and start carving.
