Plain, flat walls can leave a room feeling unfinished and uninspired. The solution, however, is often simpler and more affordable than you might think. Decorative wall molding and trim are powerful design tools that can instantly add character, depth, and a touch of custom elegance to any space . From the classic charm of picture-frame molding to the clean lines of modern slat walls, these architectural details transform ordinary rooms into extraordinary ones.
In 2026, wall molding isn’t about mere decoration—it’s about proportion, shadow, and turning flat surfaces into architectural statements . Interior designers favor molding because it adds structure and sophistication that paint alone cannot achieve . Whether you’re looking to add warmth to a new-build home, differentiate zones in an open-plan layout, or simply create a stunning focal point, the right molding design can elevate your space with timeless appeal .
Below, explore 15 thoughtfully curated wall molding ideas that range from classic to contemporary, each designed to inspire your next home improvement project.
1. Picture Frame Molding
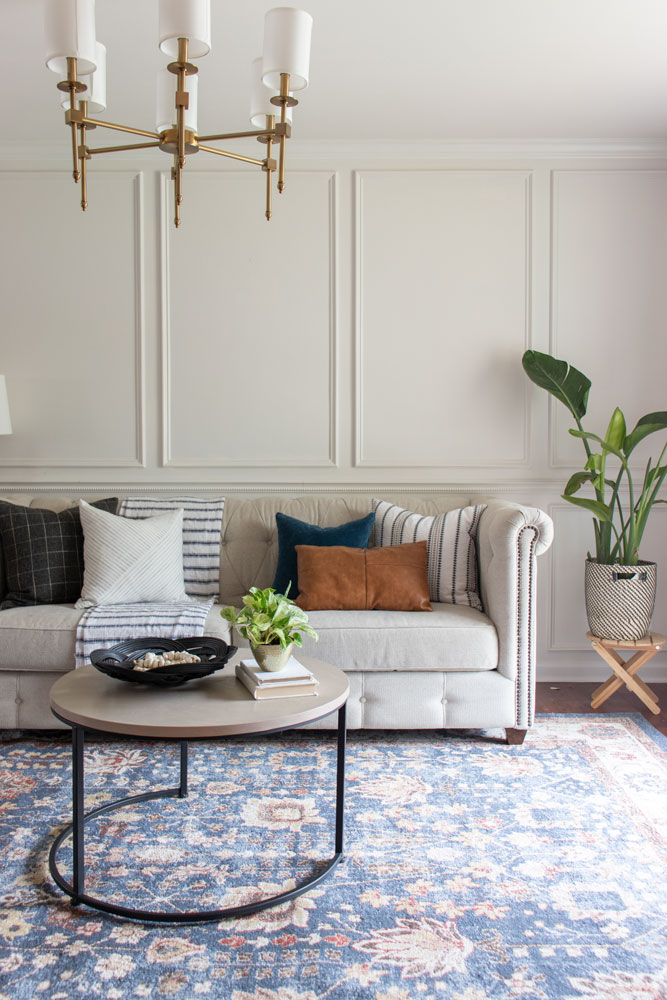
This classic design involves creating rectangular “frames” on the wall using thin molding strips. It adds a sense of history and architectural interest without overwhelming the space . The empty frames create visual rhythm and can define specific areas while adding subtle texture.
Best For: Living rooms, dining rooms, bedrooms, entryways
Style: Traditional, classic, Parisian elegance
Pro Tip: Use painter’s tape to map out your boxes on the wall before cutting—this helps visualize spacing and proportions .
2. Board and Batten
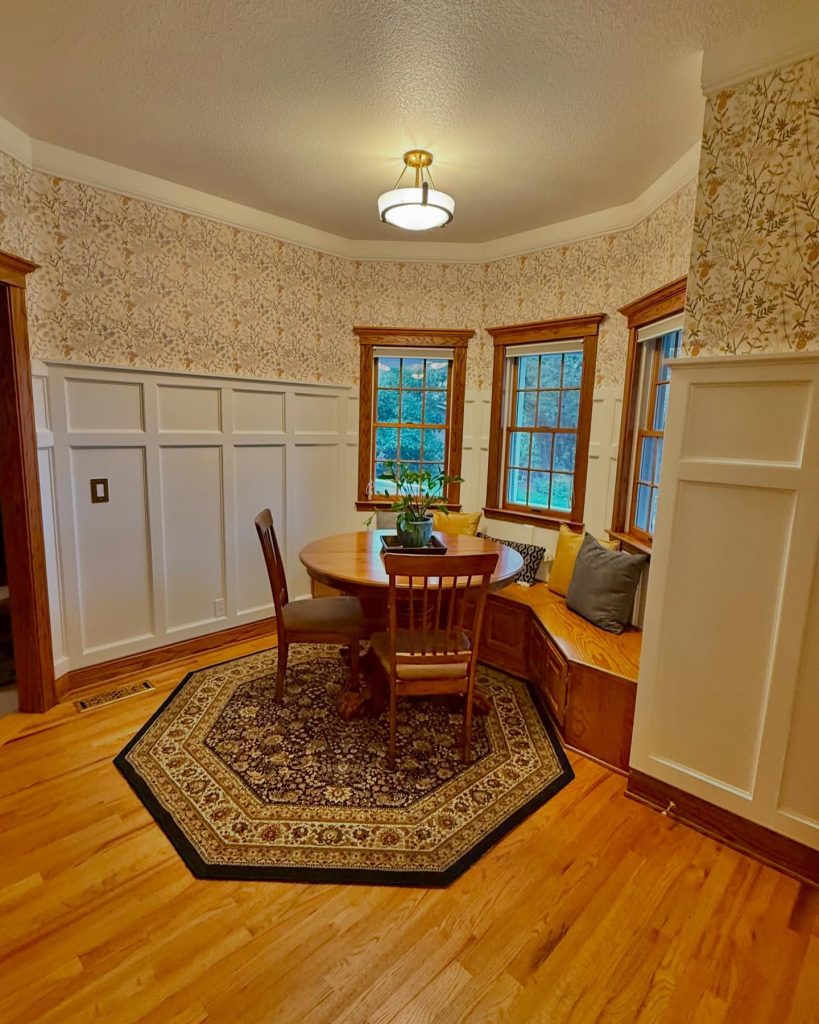
Originally used on home exteriors, this style features wide vertical boards installed over a wall, with thinner strips called “battens” covering the seams . It adds a rustic, farmhouse, or coastal feel and can be installed on the lower third of a wall or as a full accent wall .
Best For: Entryways, hallways, mudrooms, bedrooms
Style: Farmhouse, coastal, traditional
Pro Tip: For a traditional look, space battens 12–20 inches apart .
3. Classic Wainscoting
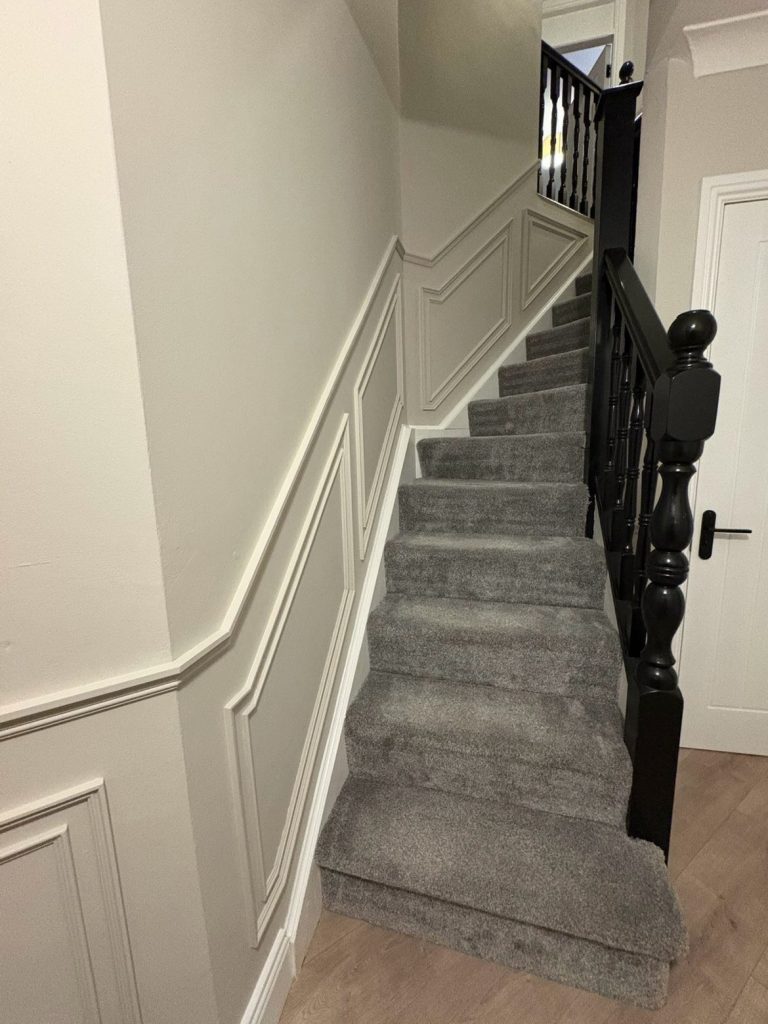
Wainscoting covers the lower portion of a wall (typically 32–48 inches high), featuring panels and molding topped with a chair rail . Originally designed to protect walls from scuffs, it now adds formality and grace to any room .
Best For: Dining rooms, powder rooms, formal living rooms
Style: Classic, traditional, formal
Pro Tip: For a budget-friendly DIY approach, create faux wainscoting using picture frame molding below a chair rail .
4. Modern Geometric Slat Wall
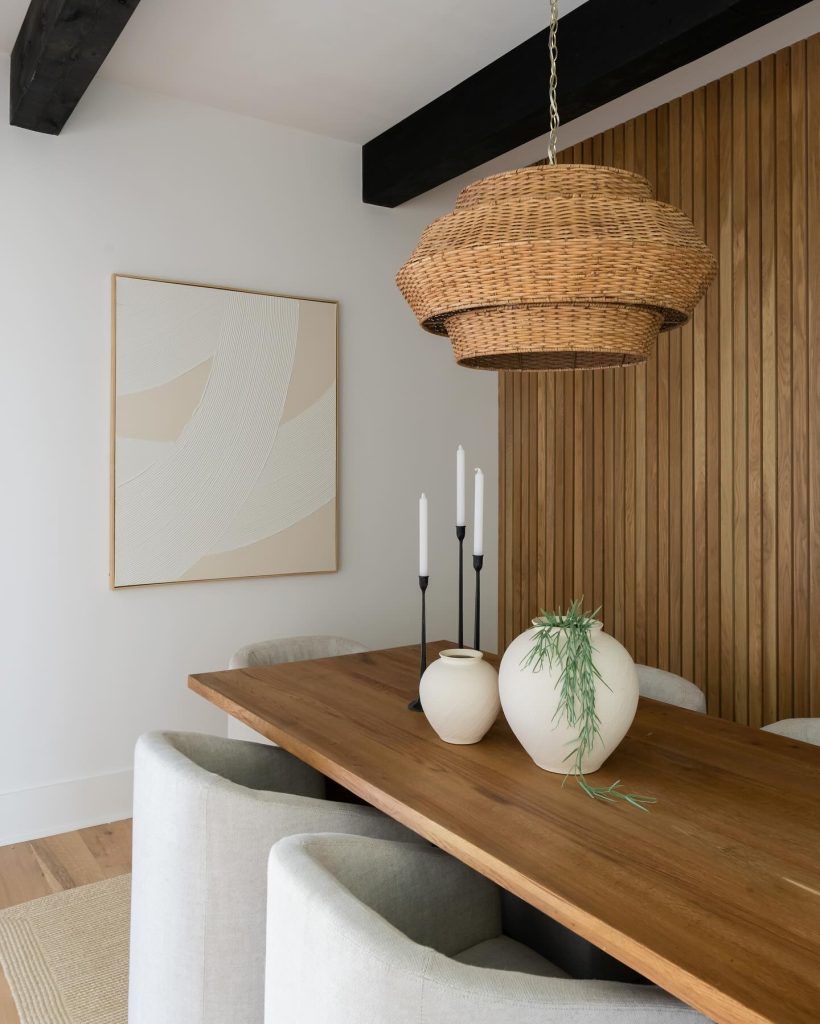
This contemporary design uses thin wood slats arranged in dynamic patterns of intersecting lines, chevrons, or abstract shapes . It’s a striking way to add texture and movement to a room.
Best For: Bedrooms, living rooms, home offices
Style: Modern, contemporary, bohemian
Pro Tip: Lay out your slats on the floor before attaching them to the wall to perfect the design without trial and error .
5. Sleek Vertical Slat Wall (Fluted Panels)
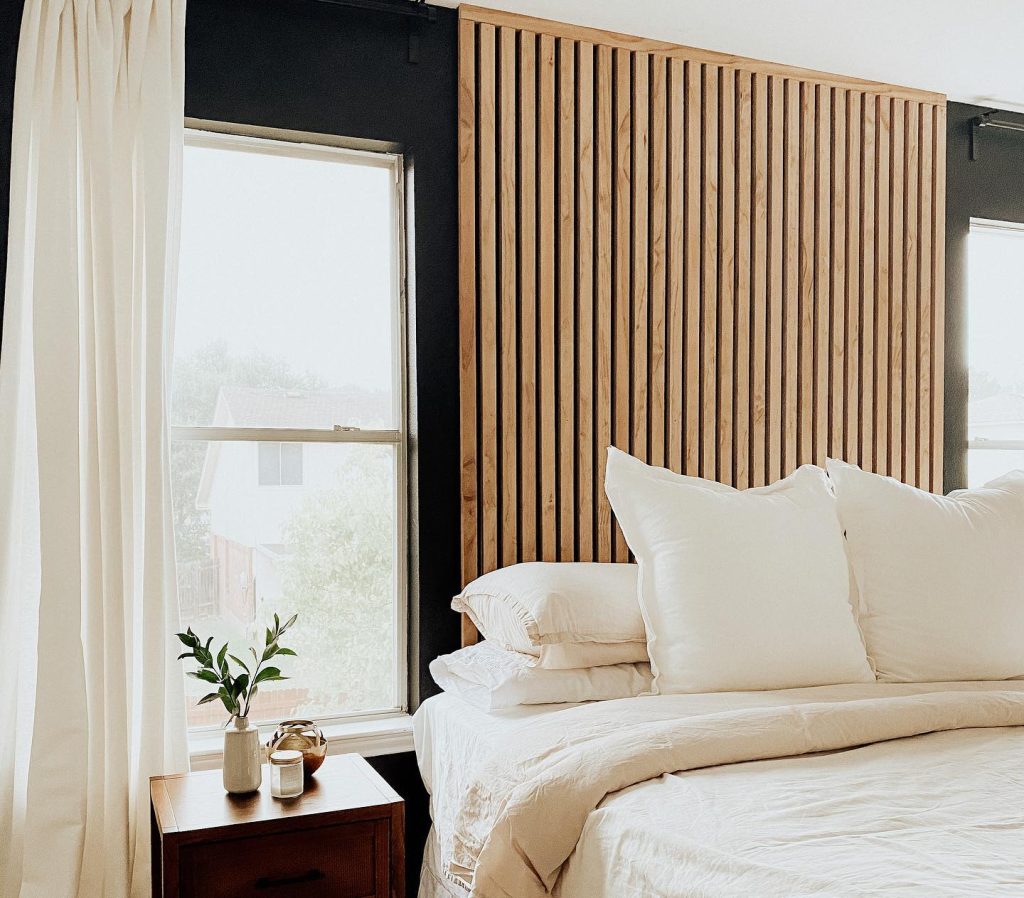
Vertical slats, also known as fluted or reeded panels, bring a sense of height and sleek sophistication . The vertical lines draw the eye upward, making rooms feel taller and more open .
Best For: Media rooms, bedrooms, modern living spaces
Style: Mid-century modern, minimalist, contemporary
Pro Tip: Consider pre-made acoustic slat panels with felt backing for easy installation and sound-dampening benefits .
6. Parisian-Style Molding
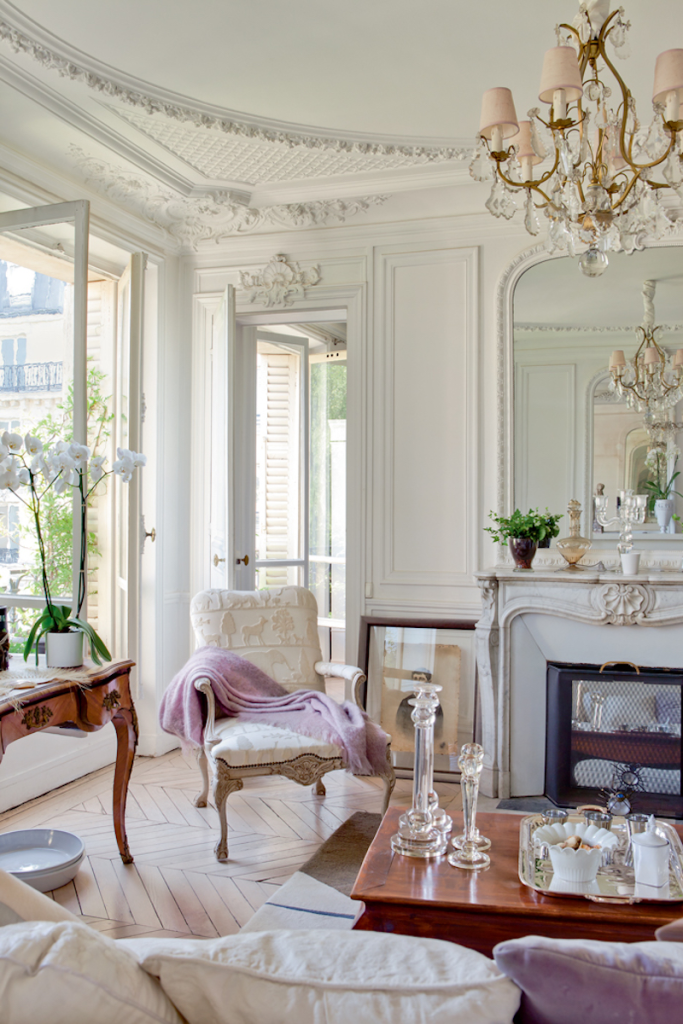
Inspired by elegant Parisian apartments, this style features intricate picture frame molding arranged in formal patterns, often with curved corners or decorative corner pieces . It exudes romance and old-world charm.
Best For: Bedrooms, formal living rooms, dressing areas
Style: Parisian, romantic, classic chic
Pro Tip: Decorative corner pieces or appliques are key to achieving this look without complex miter cuts .
7. Two-Tone Molding
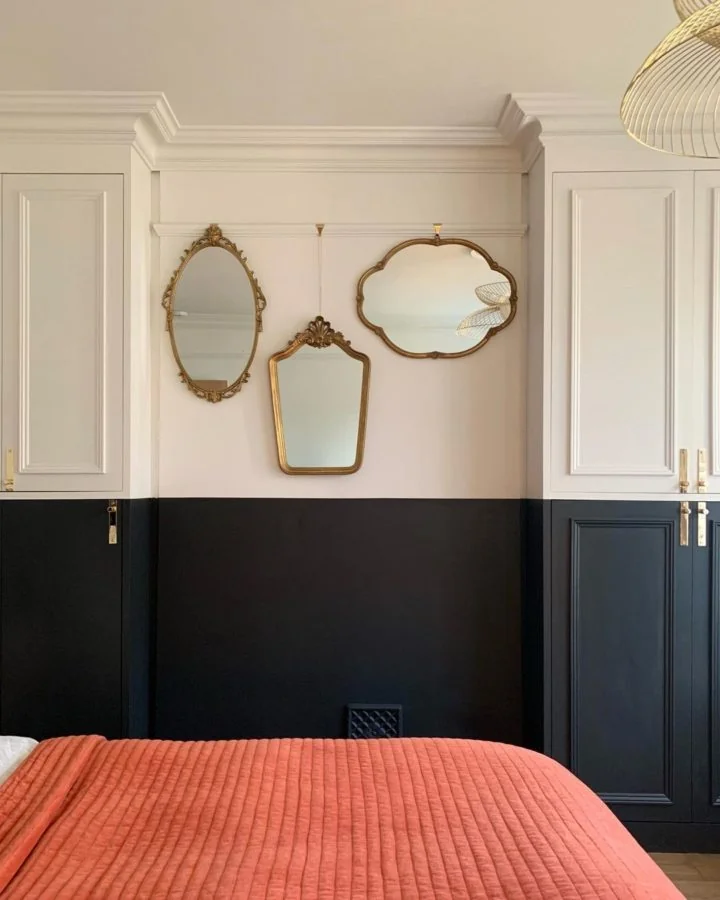
Paint the molding and wall in two different colors for a bold, graphic effect . This approach can ground a space with darker colors on the lower third while keeping it airy with lighter shades above .
Best For: Dining rooms, bedrooms, entryways
Style: Modern, bold, eclectic
Pro Tip: Use high-quality painter’s tape for crisp lines and test colors in different lighting before committing .
8. Monochromatic Board and Batten
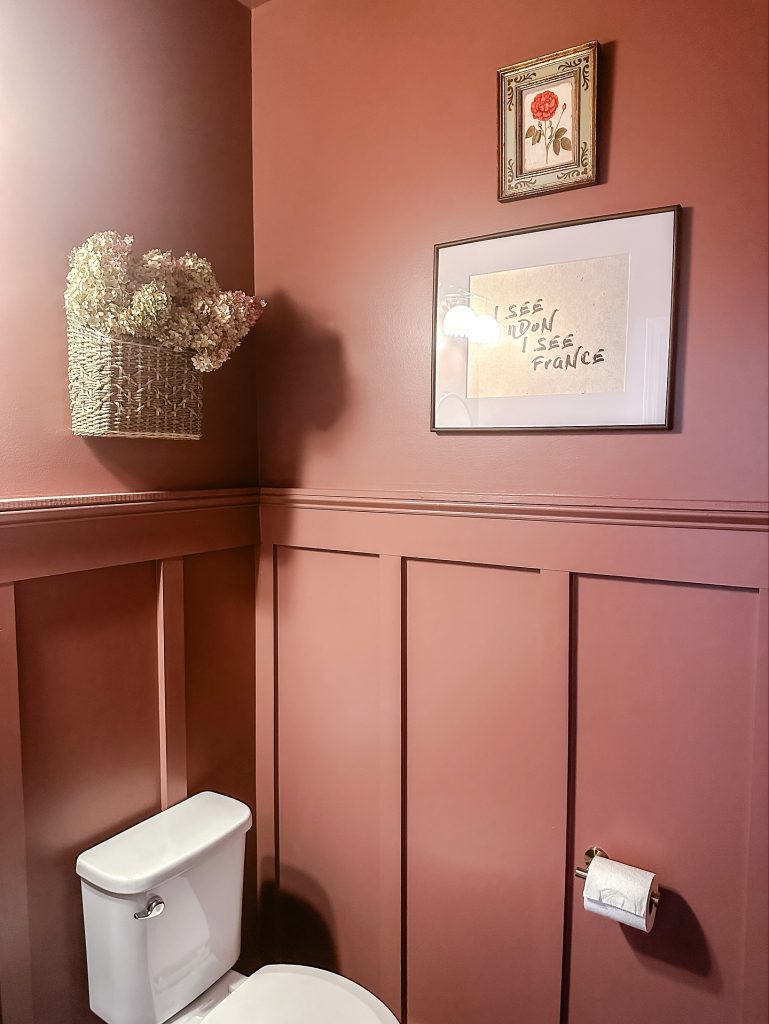
A modern take on a classic: install board and batten and paint both the wall and trim the exact same color and finish . This technique emphasizes texture and shadow over color, creating a serene and sophisticated look.
Best For: Modern interiors, spaces where subtlety is key
Style: Contemporary, sophisticated
Pro Tip: This approach works especially well with bold, deep colors where light and shadow play dramatically across the surface .
9. Crown Molding
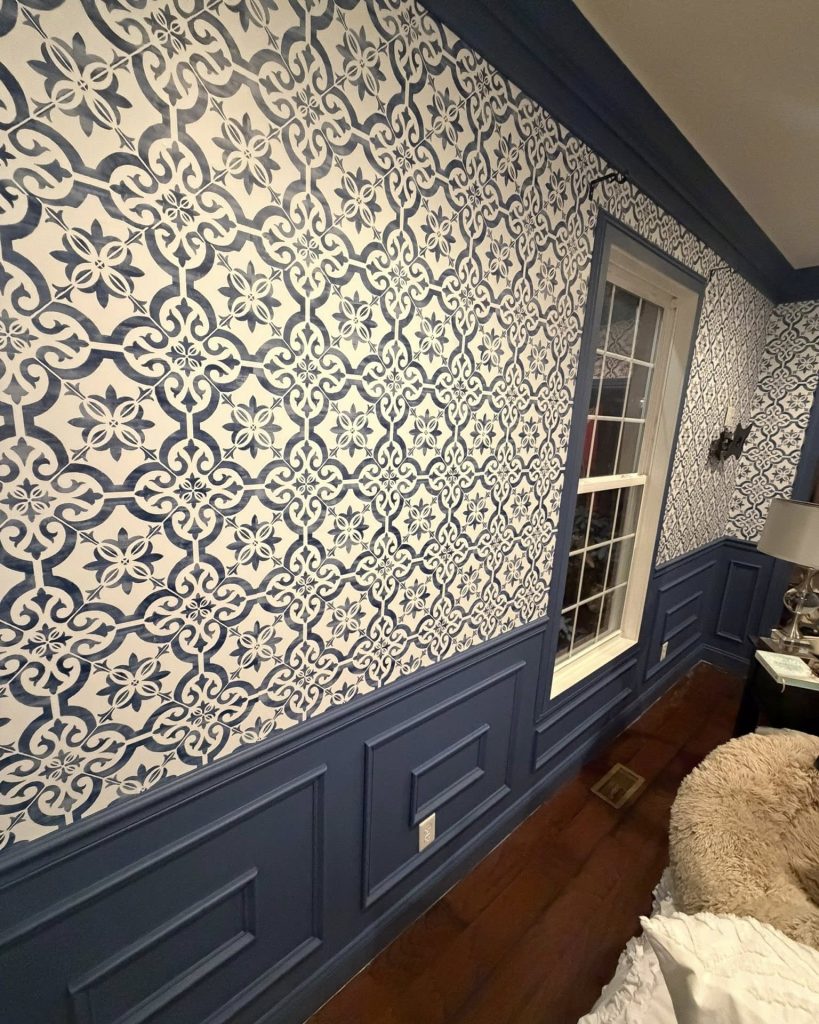
A timeless architectural feature installed where walls meet the ceiling, creating a seamless and sophisticated transition . Crown molding adds height and elegance to any room .
Best For: Any room, particularly formal spaces and those with high ceilings
Style: Classic, traditional, refined
Pro Tip: White crown molding on white walls creates depth and texture while maintaining a modern, airy feel .
10. Shadow Gap Details
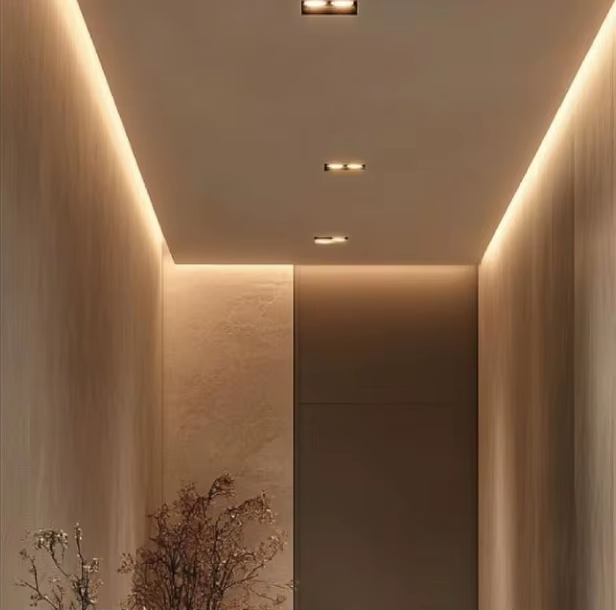
Minimalist picture-frame panels with a 10–15mm gap around each frame create crisp geometry and reduce visual weight—ideal for small spaces . The shadow lines add rhythm without crowding the room.
Best For: Small spaces, contemporary interiors
Style: Minimalist, modern
Pro Tip: Shadow gaps expose imperfections, so ensure walls are smooth and corners are tight before installation .
11. Contrasting Colored Molding
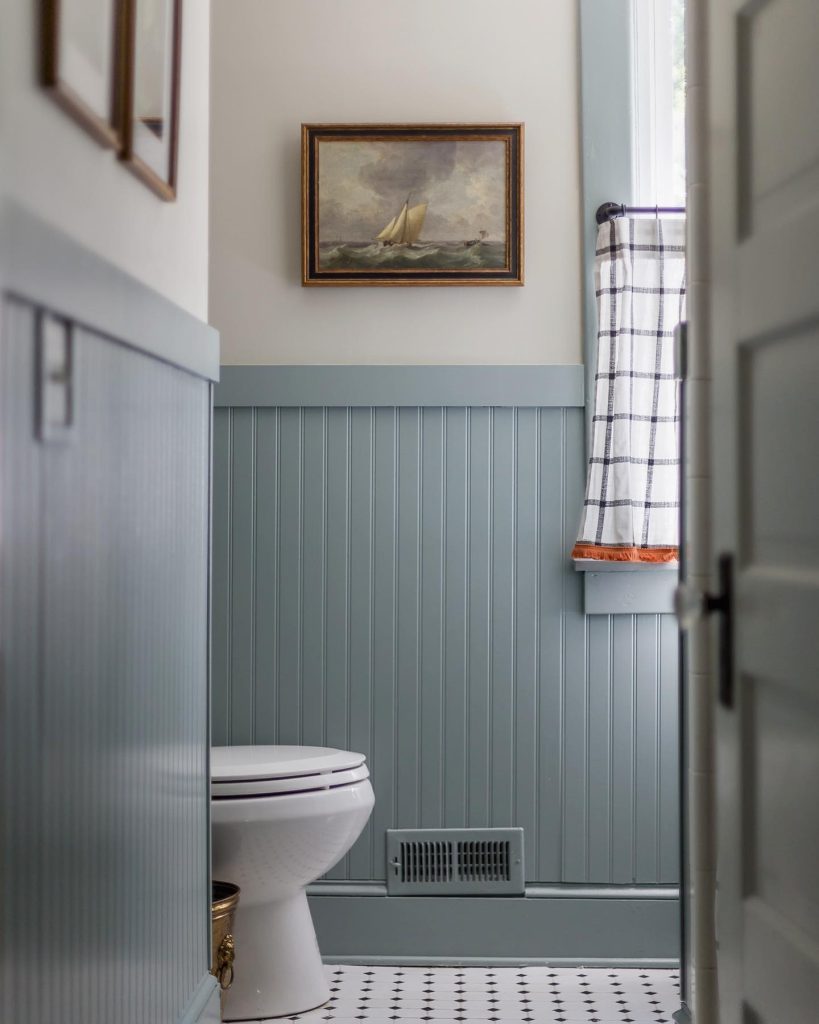
Bold moldings in deep black, forest green, or navy blue on lighter walls create striking visual effects . These color plays add character and depth to any room .
Best For: Accent walls, spaces needing drama
Style: Bold, contemporary
Pro Tip: Opt for different tones of the same chromatic family—light gray walls with darker gray panels, for example—for a cohesive look .
12. Slim Wainscoting (36–42 inches)
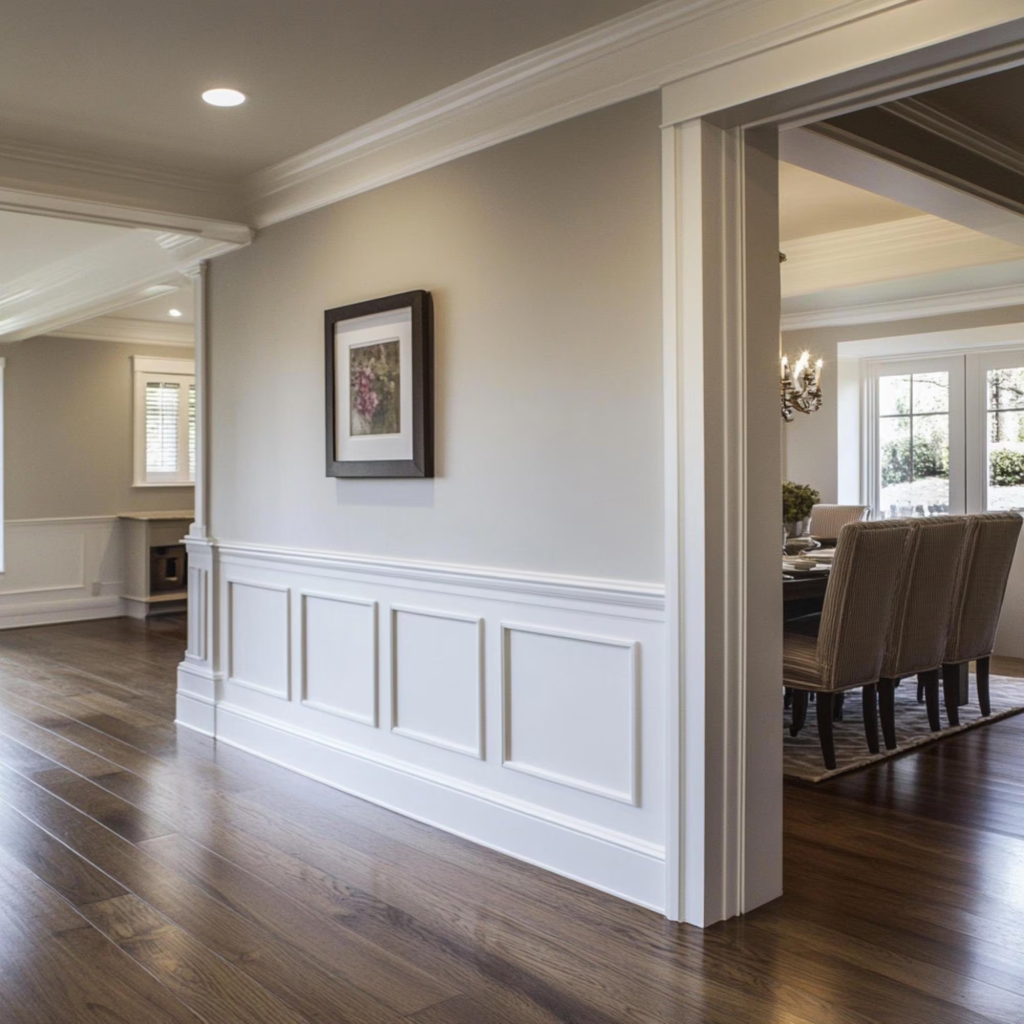
Modern wainscoting uses slim profiles at approximately one-third of wall height, a time-tested proportion that reads clean and contemporary . It’s practical in high-traffic areas and makes upper walls feel expansive .
Best For: Dining nooks, tight spaces, high-traffic areas
Style: Modern, transitional
Pro Tip: In very low rooms, consider 32–34 inches instead of 36 to avoid eating too much vertical space .
13. Cove Molding with Integrated Lighting
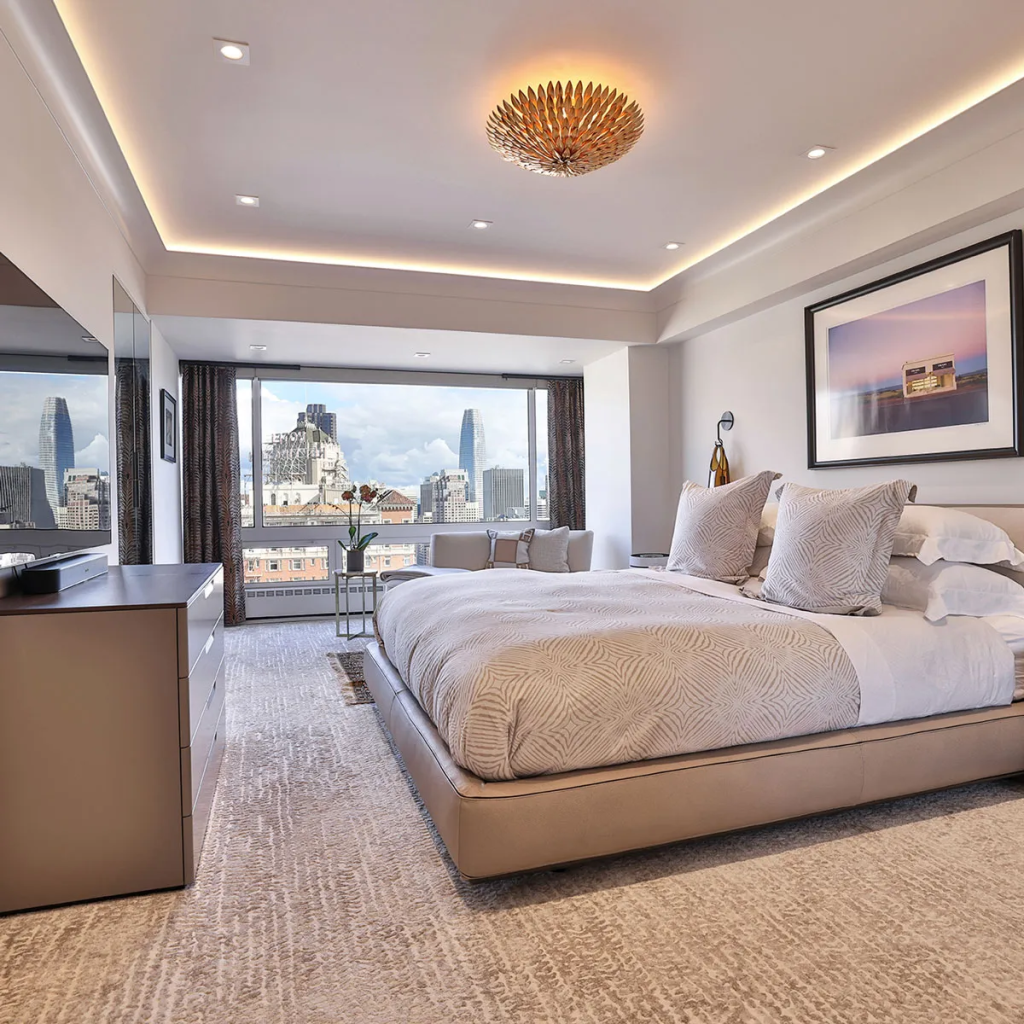
A curved cove at the ceiling with concealed LED strips adds softness and indirect light that makes rooms feel taller and calmer . This blends architecture and illumination for a sophisticated effect.
Best For: Bedrooms, spaces needing soft ambiance
Style: Modern, elegant
Pro Tip: Use high-quality LED tape with high CRI (90+) and warm 2700–3000K color temperature. Budget $20–$45 per linear foot depending on electrical scope .
14. Simple Paneled Entryway
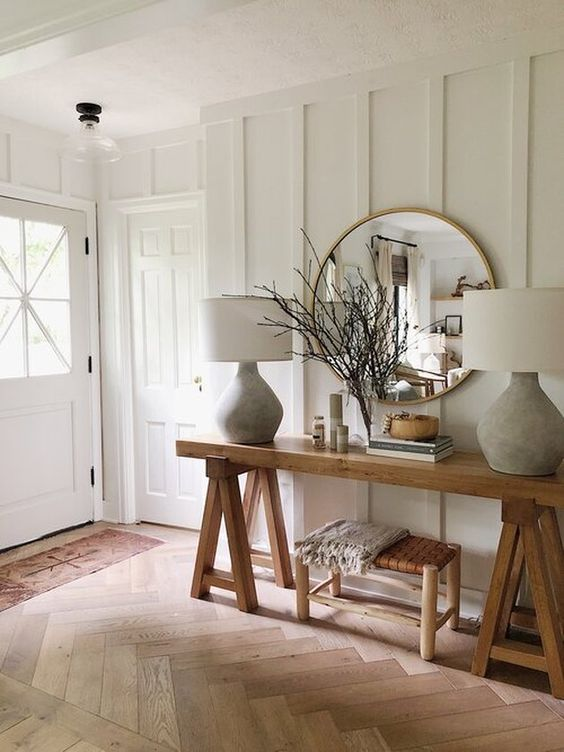
Flat-stock boards creating a clean, grid-like pattern in the entryway make a welcoming first impression . Clean lines provide structure without overwhelming a small space .
Best For: Entryways, foyers, mudrooms
Style: Craftsman, transitional, modern farmhouse
Pro Tip: Plan paneling around existing features like light switches and outlets for a seamless look .
15. Full-Height Panel Grids
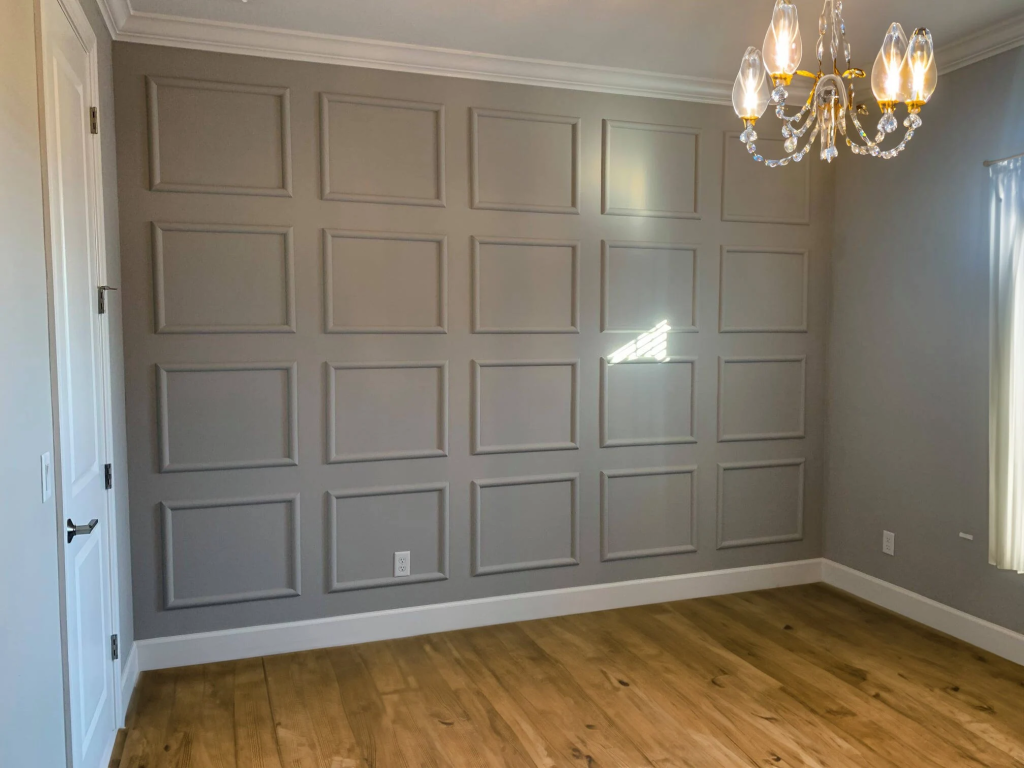
Entire walls covered in structured panels create architectural definition in formal spaces . This treatment adds grandeur to large rooms with high ceilings .
Best For: Large living rooms, spaces with high ceilings
Style: Formal, grand, architectural
Pro Tip: Avoid in compact bedrooms or narrow rooms—too much geometry in a small space feels heavy .
Room-by-Room Molding Recommendations
Different spaces benefit from different molding styles based on function, traffic, and desired atmosphere:
Living Rooms
Best Options: Crown molding, picture frame molding, full-height panel grids
Why: These formal styles add elegance and create a sophisticated gathering space. Crown molding defines the ceiling line beautifully.
Bedrooms
Best Options: Board and batten, vertical slat walls, Parisian-style molding
Why: Bedrooms benefit from texture and warmth. Vertical slats add height, while board and batten creates a cozy, grounded feel.
Bathrooms
Best Options: PVC board and batten, wainscoting
Why: Moisture resistance is essential. PVC moldings withstand humidity without warping or rotting. Keep designs simple and easy to clean.
Entryways and Hallways
Best Options: Simple paneled grids, board and batten, picture frame molding
Why: These high-traffic areas need durable treatments that make a strong first impression without overwhelming narrow spaces.
Dining Rooms
Best Options: Classic wainscoting, two-tone molding, Parisian-style molding
Why: Formal dining spaces benefit from traditional, refined treatments that create an elegant entertaining atmosphere.
Home Offices
Best Options: Vertical slat walls, monochromatic board and batten, shadow gap details
Why: Clean, minimalist treatments reduce visual clutter and create a focused, professional environment.
Color and Finish Considerations
The finish you choose dramatically affects how molding interacts with your space:
White on White
Painting both walls and molding the same white creates subtle texture and shadow play. This approach feels clean, modern, and spacious, making rooms feel larger and brighter.
Contrasting Colors
Using different colors for walls and molding creates bold definition. Dark molding on light walls grounds the space, while light molding on dark walls adds crisp, graphic appeal.
Monochromatic Depth
Using different tones of the same color family creates sophisticated, layered spaces. Light gray walls with deep charcoal molding, for example, adds dimension without jarring contrasts.
Natural Wood Finishes
Stained wood molding brings warmth and organic texture. Perfect for traditional homes, craftsman styles, and spaces where natural materials complement other design elements.
Pro Tip: Always test paint colors on your actual wall surface under different lighting conditions before committing. Molding creates shadows that can alter how colors appear.
DIY vs. Professional Installation
When to DIY
- Simple picture frame molding installations
- Board and batten on flat, smooth walls
- Basic crown molding in small rooms
- Projects with straight cuts and simple layouts
- You have access to proper tools (miter saw, nail gun, level)
- Budget is a primary concern
When to Hire a Professional
- Complex crown molding with multiple angles
- Intricate geometric or curved designs
- Rooms with uneven walls or ceilings
- Projects requiring electrical work (integrated lighting)
- Large-scale installations across multiple rooms
- You value perfect corners and seamless joins
Cost Expectations
- DIY Basic Projects: $50–$200 for materials
- DIY Premium Projects: $200–$800 for materials
- Professional Installation: $500–$3,000+ depending on scope and complexity
- Custom Designs: $5,000+ for intricate, room-wide treatments
Pro Tip: If your walls are textured or uneven, professional preparation ensures molding sits flush and looks flawless.
Installation Best Practices
Follow these essential steps for successful molding installation:
Preparation
- Measure carefully —measure twice, cut once cannot be overstated
- Map your design —use painter’s tape to visualize layout on walls
- Check for level —ensure your wall and floor are level before starting
- Locate studs —mark stud positions for secure attachment
Cutting
- Use a miter saw —essential for clean, precise angle cuts
- Cut crown molding upside down —this ensures correct orientation against the wall
- Label pieces —mark each cut piece with its position to avoid confusion
Installation
- Use adhesive and nails —construction adhesive plus finishing nails provide strongest hold
- Pre-drill holes —prevents wood from splitting near edges
- Nail into studs —secure attachment prevents shifting over time
Finishing
- Fill nail holes —use wood filler and sand smooth
- Caulk seams —fill gaps between molding and wall for seamless finish
- Prime and paint —use high-quality primer and paint for lasting results
Molding Styles by Architectural Era
Understanding the historical context of molding styles helps you choose designs that complement your home’s existing architecture:
Victorian (1837–1901)
- Characteristics: Ornate, elaborate, layered moldings
- Common profiles: Ogee, dentil, multiple stacked crown layers
- Best For: Historic homes, formal traditional interiors
Craftsman (1900–1930)
- Characteristics: Simple, clean lines, natural materials
- Common profiles: Flat boards, square edges, minimal ornamentation
- Best For: Bungalows, arts and crafts homes, modern farmhouse
Mid-Century Modern (1945–1970)
- Characteristics: Minimalist, horizontal lines, geometric forms
- Common profiles: Thin slats, shadow gaps, flush transitions
- Best For: Ranch homes, contemporary renovations
Contemporary (2000–Present)
- Characteristics: Clean, bold, mixed materials, vertical emphasis
- Common profiles: Fluted panels, dramatic proportions, asymmetric arrangements
- Best For: New builds, modern interiors
Common Mistakes to Avoid
1. Wrong Proportions
Molding that is too thin or too thick for your room’s scale looks awkward. Standard guideline: room height × 0.02 = maximum molding depth for trim.
2. Improper Spacing
Picture frames that are too close together or unevenly spaced create visual chaos. Maintain consistency and leave breathing room between elements.
3. Skipping Preparation
Unpainted or unprimed molding leads to poor paint adhesion. Failing to caulk gaps leaves visible seams that spoil the illusion.
4. Ignoring Existing Architecture
Your molding should complement, not compete with, existing architectural features like fireplaces, built-ins, or window trim.
5. Forgetting the Ceiling
Crown molding that doesn’t extend around the entire room or clashes with ceiling treatments undermines the cohesive look.
6. Overcrowding Small Spaces
Too much molding in a small room feels heavy and oppressive. Simpler, spaced-out designs work better in compact areas.
Budget-Friendly Alternatives
Not ready for full molding installation? Consider these cost-effective options:
Wallpaper with Molding Effects
Peel-and-stick wallpapers that mimic paneling, wainscoting, or beadboard offer instant transformation without construction.
Faux Molding with Paint
Use painter’s tape to create geometric patterns and paint within the lines—a temporary, zero-cost alternative that achieves similar visual effects.
Trim Tape
Self-adhesive trim tape creates raised lines and patterns without nails or glue, removable and repositionable for rental-friendly updates.
Half-Wall Treatments
Limit molding to the lower third or half of the wall to reduce material costs while still adding architectural interest.
Stenciled Patterns
Stencils create decorative molding-like patterns at a fraction of the cost, especially effective for medallions or corner details.
Maintenance and Long-Term Care
Regular Care
- Dust molding regularly with a soft cloth or feather duster
- Wipe clean with a damp cloth for stubborn dirt
- Avoid abrasive cleaners that can damage paint or wood
Touch-Ups
- Keep leftover paint for quick touch-ups
- Fill new dents or scratches promptly to prevent further damage
- Re-caulk gaps that appear over time from seasonal movement
When to Refresh
- Repaint every 5–7 years or when paint shows significant wear
- Consider updating outdated molding styles during major renovations
- Inspect for wood rot or water damage annually in humid spaces
Conclusion
Wall molding remains one of the most effective and accessible ways to add architectural character to any home. From the timeless appeal of crown molding and wainscoting to the contemporary elegance of vertical slats and shadow gaps, the possibilities are as varied as your personal style.
The key to successful molding lies not just in selecting a beautiful design, but in understanding your space—its proportions, natural light, and existing architecture. Pair the right style with appropriate materials, choose colors that enhance your vision, and follow proper installation techniques to ensure lasting beauty.
Whether you’re a confident DIY enthusiast or prefer professional installation, wall molding offers an immediate and dramatic return on investment in both aesthetic value and homeowner satisfaction. A room with thoughtfully designed molding feels intentional, polished, and complete—it elevates the everyday experience of your home.
Start small with a single accent wall, or transform an entire room—each project adds character that makes your space feel custom, cared for, and undeniably yours. With these 15 ideas and essential guidance, you’re ready to create interiors with architectural interest that will be admired for years to come.
