The pickled finish is a popular topic among designers, especially when it comes to oak. I’ve done countless versions of this finish, and it’s no secret that using unslaked lime is the true recipe. However, most designers opt for an easier method using white paint and solvent or water.
When applied to oak, this finish creates a chalky appearance that fills the pores, giving the wood a unique look. Achieving an even look on other woods like ash or pine can be challenging, but with oak, the finish is consistent and beautiful. If the paint-wash collects in the molding crevices, painting the oak white is always an option.
In my latest project, I used a red oak plywood panel with solid red oak molding attached to it. The red oak’s natural color enhances the white-washed effect, creating a pink overtone that’s reminiscent of Andy Warhol’s art. Here’s how to pickle wood paneling.
Also, check out: Finishing Oak for outdoors
What is Pickling Oak?
Pickling oak is a process of applying a white or light-colored stain/paint to oak wood. This process creates a washed-out, weathered effect. This technique is different from traditional staining, where the stain is absorbed into the wood and changes its color.
Pickling, unlike classic wood staining, sits on top of the wood and lightens its color while not obscuring the natural grain patterns.
Did you know you could washcoat with milk paint? (See Milk Paint Finish: an overview)
Preparing the Oak Wood
Before pickling oak, it’s important to prepare the wood properly.
- Start by sanding the wood with fine-grit sandpaper to ensure a smooth surface.
- Next, apply a pre-stain conditioner (helps the pickling stain to absorb evenly and prevent blotching).
- Give the conditioner time to completely dry.
How to pickle wood paneling
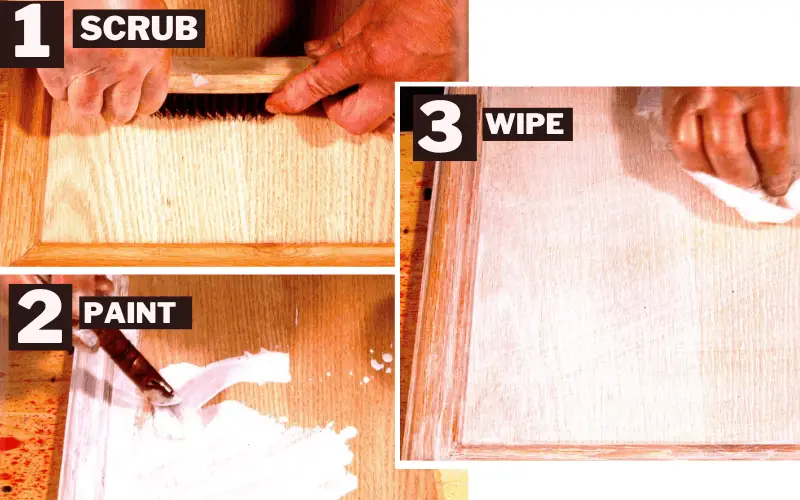
- Start by scrubbing the wood lightly with a wire brush. As you scrub make sure to go with the grain as much as possible
- Mix your white paint with solvents in the ratio of 1 part paint to 3 parts solvent. Avoid latex paint as it can raise the grain.
- Scoop the paint with a brush and start painting your oak wood
- Once the entire surface is painted get some paper towels and wipe off the excess. If you took too long and the paint is set up, do not panic just wet the paper towel with thinner and wipe the surface. The thinner will reactivate the paint.
- Wiping off the paint should be done in two directions. First, wipe across the grain to get the paint in your oak’s pores. Then wipe along the grain for an even spread.
Applying the Protective Finish
After washing and wiping all surfaces, allow everything to dry for about twenty-four hours. Then, apply a coat of white shellac using a 1-to-1 spit coat ratio. Sand this sealer coat with 320-grit sandpaper, rub with No. 0000 steel wool, and finish by applying a coat of wax. Alternatively, you can opt to top coat with lacquer or Varathane.
It is not recommended to use polyurethane or varnish as a topcoat because they tend to have an amber color that can make the white effect look old and yellowed. For a clear and water-like finish, lacquer is the best option. For those who are new to the process, brushing lacquer is the recommended option. However, it is suggested to practice on a sample piece before applying it to the actual project.
Tips for Pickling Oak
- Choose the right pickling paint. White is the most popular color, but you can also choose from gray, blue, and other light colors.
- Test the pickling paint on a small, inconspicuous area of the wood first to ensure you achieve the desired look.
- Apply the pickling paint in a well-ventilated area and wear gloves and a mask to protect yourself from fumes.
- Use a high-quality brush or rag to apply the pickling paint for the best results.
Conclusion: How to pickle wood paneling
In conclusion, pickling oak is a popular finish that creates a unique, weathered effect on oak wood. It’s a process that involves applying light-colored paint on top of the wood. Although the traditional pickling recipe involves using unslaked lime, many designers use a more straightforward method using white paint and solvent or water. This finish is especially effective on oak, where it creates a consistent and beautiful effect. When applying the pickling paint, it’s essential to prepare the wood properly and use the right pickling paint. It’s also important to apply the protective finish correctly to ensure the finish lasts. With these tips, you can achieve a stunning pickled finish on your oak wood.