A wood spirit is a face carved into a piece of wood so that it seems to be emerging from it rather than sitting on top of it. Old man, forest guardian, green man, tree elder, the names vary, but the idea is the same: heavy brows, a long nose, a flowing beard, and an expression that looks like it has been in that branch for a hundred years.
What makes them such a good beginner subject is that age is forgiving. Wrinkles, crooked features, a nose cut slightly off-centre, a beard that flows unevenly down one side — every one of those reads as character rather than error. A perfectly symmetrical wood spirit would actually look worse. Very few carving subjects let you off that lightly.
They’re also cheap to start. A dry branch from the garden, a piece of firewood, a length of cottonwood bark, or a plain basswood blank will all do, and most wood spirits need nothing more than a carving knife and perhaps a small V-tool. Nothing projects out from the block, so there’s nothing to snap, and you can stop whenever the face looks right.
The ideas below run from the simplest stick face to bark carvings, walking sticks, and spirits with leaves and hats worked into them. Each comes with a tip to keep you moving. If you’re still assembling your tools, our guide to choosing the right whittling kit covers the essentials.
The Wood Spirit Formula
Nearly every face on this list is built the same way, and once you know the order, the rest is variation.
Flatten a strip down the front of your branch or blank, just enough to give yourself a working surface. Then mark three lines across it: the hairline, the brow, and the bottom of the nose. Those three marks set every proportion in the face.
Cut the nose first. Make two angled cuts either side of a centre wedge and leave it standing proud, thicker than you think it needs to be. Everything else is positioned off the nose, so getting it placed before anything else saves endless correcting later.
Next, hollow the eye sockets either side of the nose bridge, pushing them deeper than feels comfortable, because shadow is what makes a face read from across a room. Add a heavy brow ridge overhanging each socket. Then carve the moustache flowing out from under the nose and the beard flowing down from it, using long sweeping V-cuts that all travel in the same direction.
That’s the whole formula. Nose, eyes, brow, moustache, beard. Hair, hats, leaves, and wrinkles are extras you add once the face is there.
20 Simple Wood Spirit Carving Ideas for Beginners
1. Face in a Bark-Covered Log
Let the Bark Frame the Face for You
A pale face carved into a standing log with the bark left intact all around it, a headband across the brow and a long beard flowing down the trunk. The contrast does the work here: rough dark bark against clean pale wood makes the face look genuinely revealed rather than added. You only carve the front, and the log handles the rest.
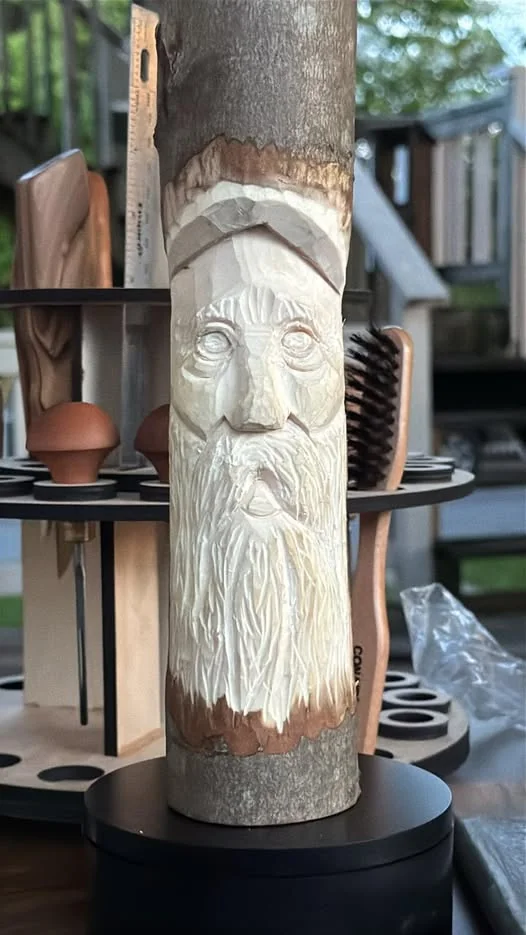
Tip: Cut through the bark cleanly with a stop cut around your working area before you start on the face, or it will tear and flake as you carve.
2. Wood Spirit on a Walking Stick
Put the Carving Somewhere It Gets Used
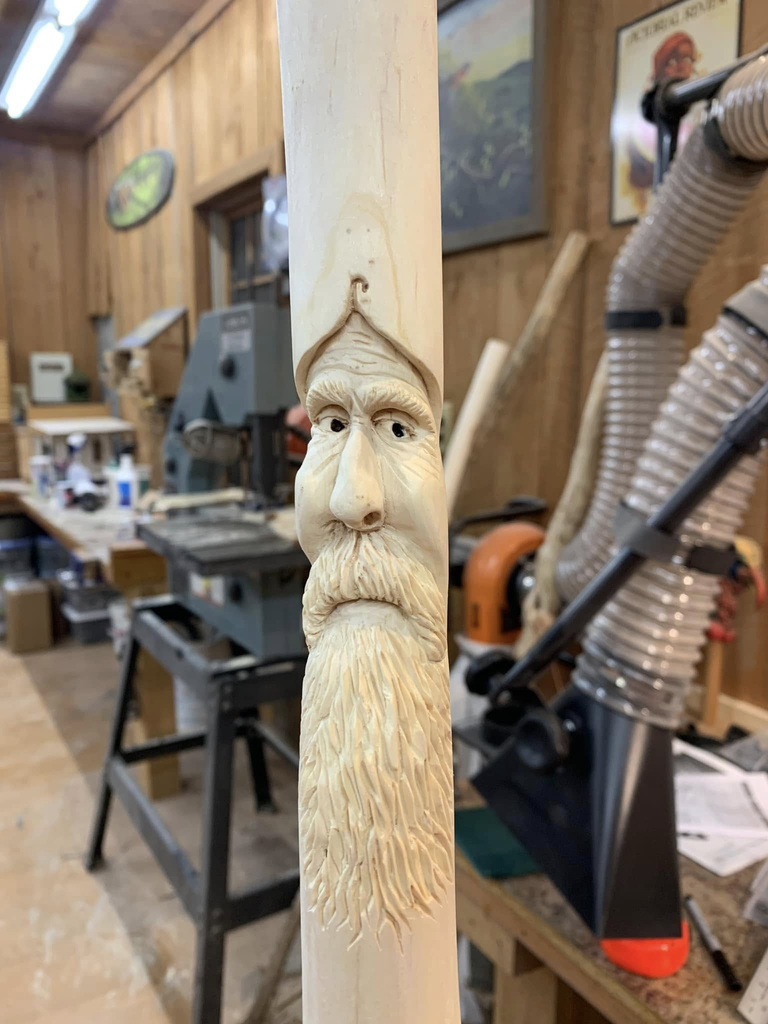
A long slim face carved near the top of a walking staff, with a peaked hat, a narrow nose, and a beard tapering right down the shaft. Carving into a stick you’ll actually walk with is deeply satisfying, and the long narrow surface forces you to stretch the face, which suits a wood spirit perfectly.
Tip: Carve the face while the stick is still overlong, then trim to height afterwards. Elongate the features to match the shaft rather than fighting its width.
3. Stern Face with Swept Hair
Cut the Wrinkles Deeper Than Feels Right
A heavily lined face filling a palm, with hair swept back off a furrowed brow, deep-set eyes under a scowl, and a thick beard falling below. Every groove here is cut hard and deep, and that’s exactly why it reads so strongly. Timid wrinkles disappear under a finish, while bold ones turn into shadow and age.
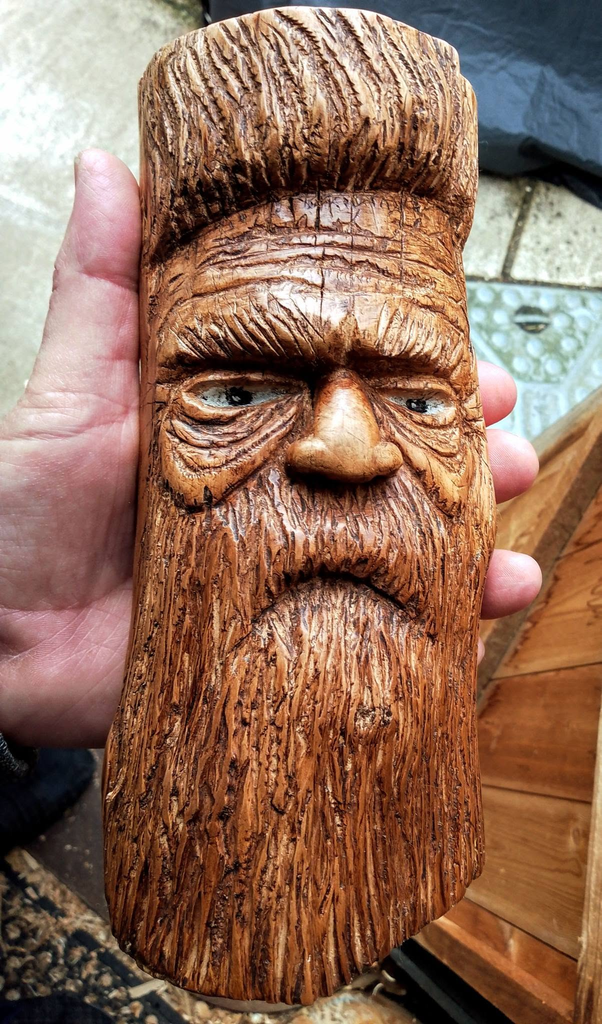
Tip: Cut every line deeper than looks right while carving. A dark stain wiped into the grooves will do the rest once you’re finished.
4. Simple Face in Cottonwood Bark
The Softest Material You’ll Ever Carve
A calm, minimal face carved into a chunk of thick bark, with closed eyes, a straight nose, and a long plain beard, the rough bark edge left untouched around it. Cottonwood bark cuts like firm cheese, so a knife glides through it and a face appears with surprisingly little effort.
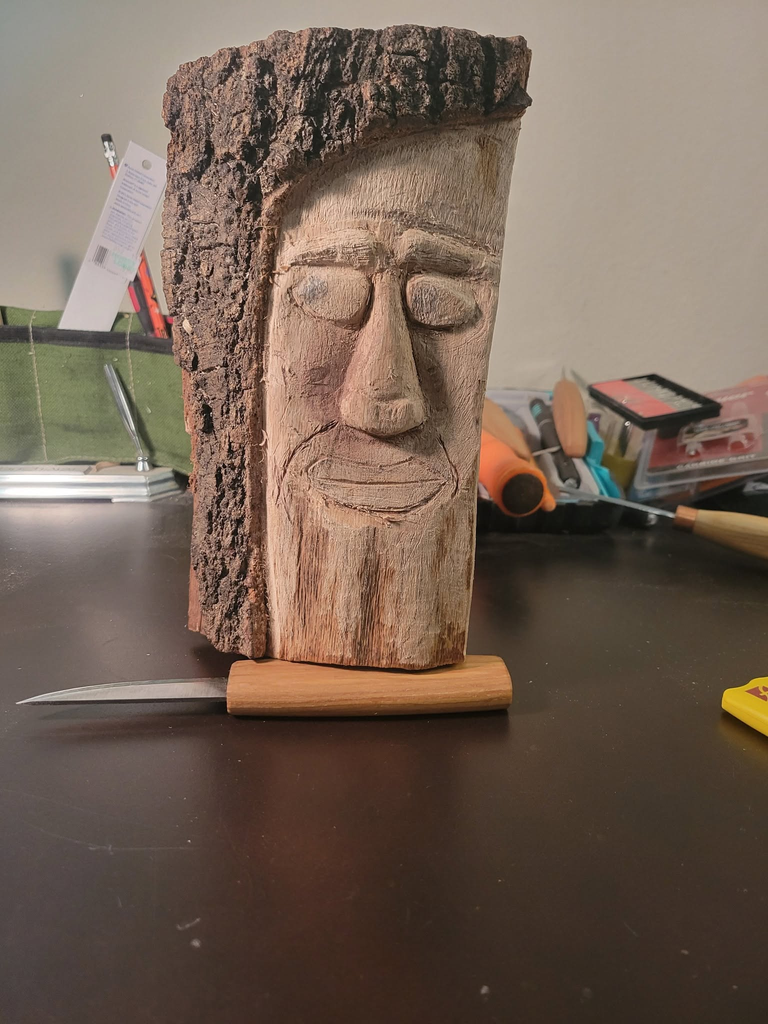
Tip: Keep the features simple and let the bark texture carry the piece. Closed eyes are easier than open ones and give the face a peaceful look.
5. Weathered Face on a Garden Stake
Carve It Rough and Leave It Outside
A gaunt face cut into a gnarled stake driven into the ground, with sunken eyes, a long nose, and a ragged beard running down the shaft. The rough, half-finished look suits a garden piece perfectly, since weather will grey the wood and deepen every groove over time.
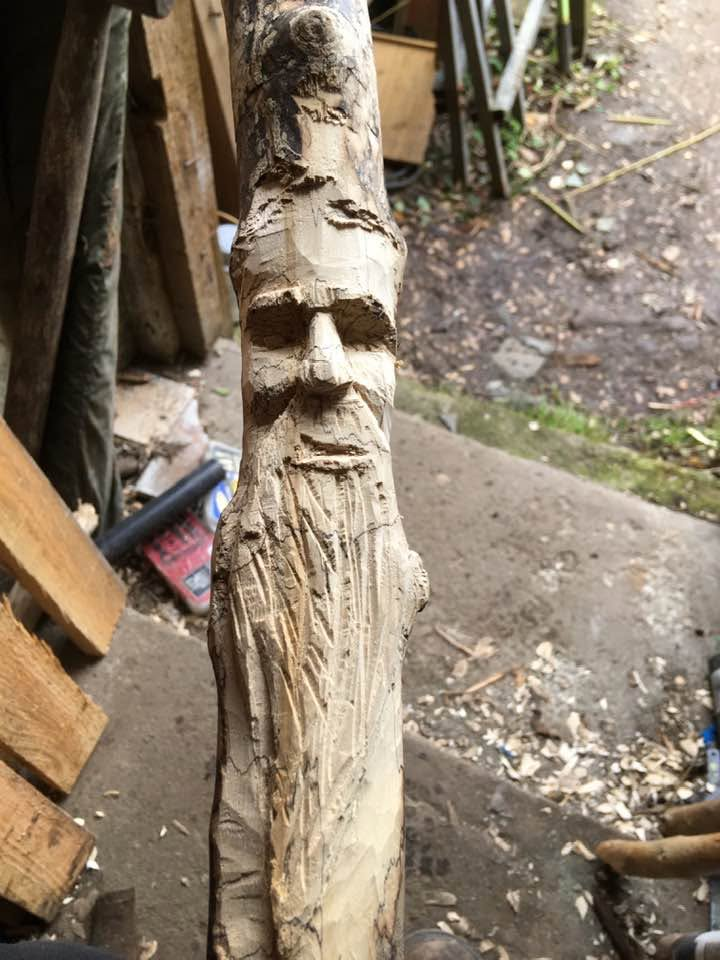
Tip: Don’t sand or fuss it. Deep, coarse cuts survive the weather, while fine detail washes out within a season or two.
6. Face on a Fresh-Cut Branch
Start with Whatever the Garden Gives You
A small face carved partway down a reddish branch still wearing its bark, with the knife held alongside for scale. The beauty of this one is that the whole project cost a walk and an hour, and the natural curve of the branch decides where the face goes and which way it looks.

Tip: Pick a branch with a slight bend or a knot and carve the face into it. Let the wood’s shape choose the expression rather than imposing one.
7. Scorched-Edge Bark Spirit
Burn the Outside, Keep the Face Pale
A bright face carved into a piece of bark whose surrounding edges have been darkened almost to black, so the pale features glow out of the surround. Scorching or staining the outer wood is a quick, dramatic way to make a carving pop, and it takes minutes once the face is done.

Tip: Finish the carving completely before you scorch, and mask or avoid the face itself. The contrast only works if the features stay light.
8. Narrow Face in a Thin Slab
Work Within a Sliver of Wood
A long, slim face carved into a narrow flat piece, with simple brows, a straight nose, and vertical grooves running the length of the beard and hair. The tight width forces you to stretch every feature, and the result has a totem-like stillness you don’t get from a wider blank.

Tip: Keep everything vertical. On a narrow piece, long parallel grooves for hair and beard unify the face and disguise the lack of room.
9. Spalted Offcut Spirit
Let the Figure in the Wood Choose the Face
A face carved into a short block streaked with dark spalting lines, the natural markings running right through the hair and beard. Wood like this does half the decorating for you, and the fun is in positioning the face so the darkest streaks land where the hair flows.

Tip: Study the grain before you draw anything. Move the face up or down the block until the figure runs the way you want the beard to fall.
10. Wood Spirit Pendant
Shrink the Whole Thing onto a Cord
A tiny bearded face strung on a leather cord, with a ribbed headband, a curled moustache, and a small beard, all in a piece no bigger than a thumb. Carving a spirit small enough to wear is a different challenge entirely, and a finished one makes a gift people actually keep.
Tip: Drill the cord hole before you carve, while the block is still square and easy to clamp. Doing it afterwards risks splitting a finished piece.

11. Green Man in Leaves
Fill the Space Around the Face with Foliage
A face peering out of a mass of overlapping carved leaves, set into a long piece of bark with the rough edges left wild. Leaves solve the problem of what to do with the space around a face, and they’re forgiving work: each one is an outline, a centre vein, and a few side veins.

Tip: Carve the face completely first, then grow the leaves outward from it. Overlap them so each one partly hides the last and the whole mass reads as depth.
12. Angular Totem Face
Cut It in Straight Lines Instead of Curves
A bold, geometric face on a small block, with a wedge nose, straight brows, and hair and beard cut as sharp parallel grooves. Dropping curves entirely gives you a striking, mask-like result, and straight cuts are faster and easier to control than flowing ones.

Tip: Commit to the style. Keep every cut straight and every angle crisp, since one soft curve in an angular face immediately looks like a mistake.
13. Long-Bearded Staff Spirit
Let the Beard Run the Length of the Stick
A richly detailed face near the top of a bark-covered staff, with a deeply grooved beard flowing far down the shaft and the bark left intact on either side. Stretching the beard is the trick that makes a face belong to a stick rather than just sitting on it.

Tip: Take the beard grooves much further down than the face seems to need. A short beard on a long shaft always looks unfinished.
14. Turbaned Elder in Green
Wrap the Head and Add Some Colour
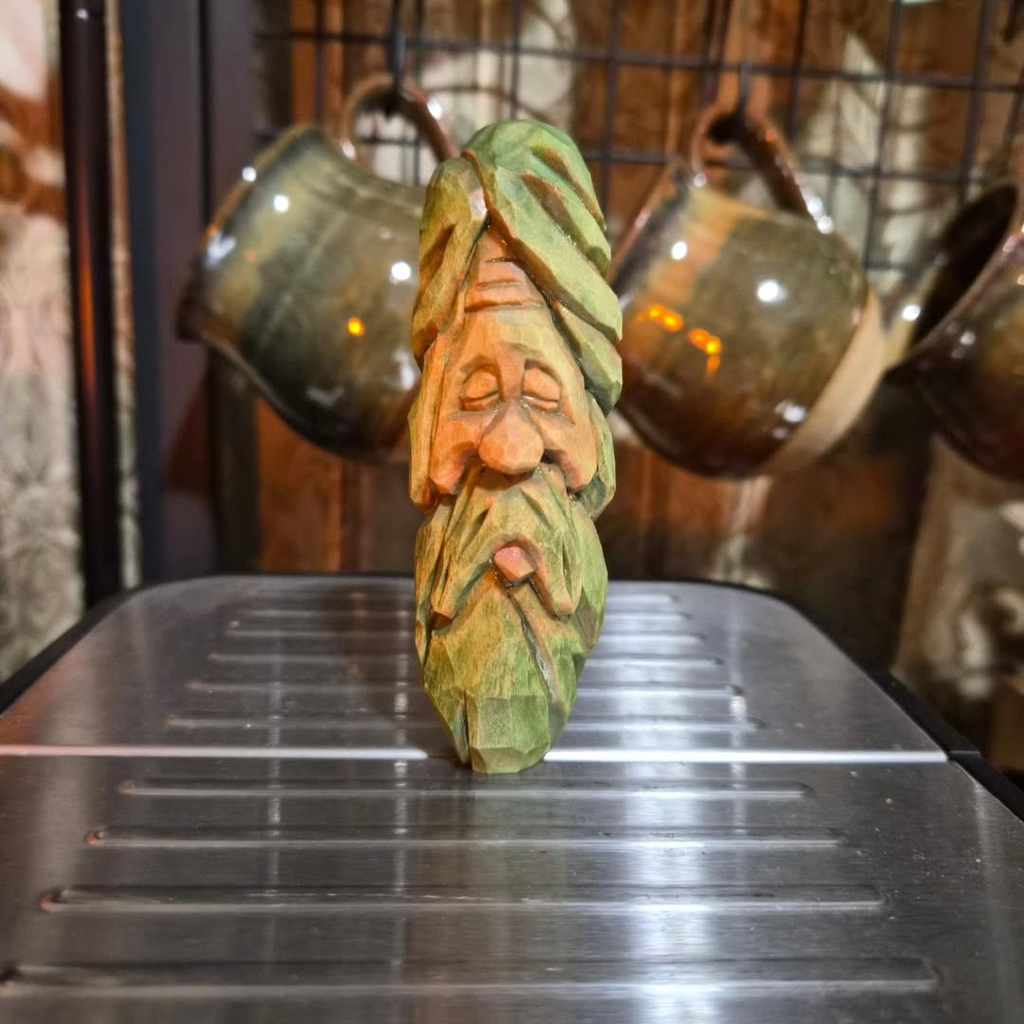
A serene face with closed eyes and a long forked beard, crowned by a wrapped turban that winds around the head in overlapping folds, the whole piece washed in soft greens over warm skin tones. The wrap is what sets this one apart, turning the top of the block into a feature instead of somewhere the carving just stops.
Tip: Cut the turban as a series of overlapping diagonal bands spiralling around the head, each one undercut slightly so it sits proud of the one beneath. A thinned green wash over carved facets keeps the tool marks visible while adding colour.
15. Cedar Block Spirit
Use the Colour Change in the Wood
A face carved into a block of cedar where the pale sapwood and deep red heartwood run right through the beard in streaks. Working in a wood with strong colour variation gives you stripes through the hair for free, and cedar smells wonderful while you cut it.

Tip: Orient the block so the colour change runs vertically through the beard. Carved across the stripes it looks accidental, along them it looks intended.
16. Face and Leaves on an Angled Offcut
Carve Into a Wedge Instead of a Flat Face
A bearded face on a steeply angled block, with leaves sweeping back over the head and the whole design following the slope of the cut. An awkward-shaped offcut is an opportunity, since the angle tilts the face and gives it an attitude you’d never plan deliberately.

Tip: Sit the offcut on the bench and turn it until an angle suggests a face. Carve to the shape you’ve got rather than squaring it up first.
17. Hatted Spirit in the Hand
Add a Hat and Change the Whole Character
A bearded face crowned with a broad textured hat, the brim overhanging the brow and casting a shadow across the eyes. A hat gives you somewhere for the carving to end at the top, and the shadow beneath the brim does more for the expression than any amount of eye detail.

Tip: Undercut beneath the brim so it genuinely overhangs. The shadow is what creates the face, and it needs real depth to work.
18. Smiling Spirit on a Split Blank
Try a Cheerful One for Once
A friendly face with a broad nose and a curved moustache above a long grooved beard, carved into a pale split block. Most wood spirits scowl, so carving a smiling one is a genuine change of pace, and a warm expression suits a piece that sits in a kitchen or on a desk.

Tip: Lift the outer corners of the moustache and curve the cheek lines upward. The mouth barely matters, since the moustache carries the smile.
19. Study from a Carving Book
Work Through a Pattern and Keep the Logic
A pale face in progress on a square blank, with the reference book open beside it and the knife still on the bench. Following a pattern teaches you where a brow sits relative to a nose and how deep a socket needs to be, which is knowledge you keep long after that particular face is finished.

Tip: Carve it exactly as written the first time. Save your own variations for the second attempt, once you know what each instruction was protecting.
20. Serene Female Spirit
Smooth Instead of Furrowed
A calm woman’s face emerging from a bark-edged log, with closed eyes, soft features, and long flowing hair sweeping down either side in deep parallel grooves. It’s the opposite of the gnarled old man, and the challenge flips: there are no wrinkles to hide behind, so the shaping has to be clean.

Tip: Keep the face free of texture entirely and pour all your detail into the hair. The contrast between smooth skin and heavily grooved hair is what carries the piece.
Finding Your Own Wood Spirits
Twenty faces, and almost none of them started life as a plan. That’s the real lesson of wood spirit carving: the material usually decides the piece, and your job is to notice what it’s offering.
Look at the wood first. A knot becomes an eye or a cheekbone, a bend in a branch tilts the head, a streak of dark heartwood runs through a beard, and an awkward angled offcut gives a face an attitude you’d never have designed. Carvers who keep a box of odd scraps end up with better spirits than those who buy square blanks, simply because the scraps make suggestions.
Then decide how far you’re taking it. A face cut with a dozen decisive strokes and plenty of bark left around it often has more life than one refined for hours. Deep grooves, heavy brows, and strong shadow read from across a room, while fine detail disappears under a finish. When in doubt, cut deeper and stop earlier.
The surround matters as much as the face. Leaves, a turban, a hat with an overhanging brim, a beard stretched the length of a staff, bark edges left wild, or scorched wood framing pale features. Each one changes the character completely while the face underneath stays exactly the same.
And remember that wood spirits belong on things you use. A walking stick, a garden stake, a pendant on a cord, a fence post by the gate. A carving that gets handled and weathered gains something a shelf piece never will.
Conclusion
Wood spirits are the most forgiving faces in carving. Age hides asymmetry, whiskers hide the mouth, shadow does the work of detail, and nothing on the piece is thin enough to snap. You can start with a branch from the garden and a single knife, and have something looking back at you within the hour.
Pick up whatever odd piece of wood is nearest, flatten a strip down the front, and cut the nose first. The rest of the face will find its own way from there. If you’d like more faces to practise on, our beginner-friendly gnome carving ideas use the same nose-and-beard logic in a simpler form, and these fun woodcarving ideas you can finish in one sitting will fill the evenings between spirits.
