Ask a room full of carvers what they made first and a surprising number will say a gnome. It’s been the standard opening project for decades, and the reason is almost embarrassingly practical: a gnome is a hat, a nose, and a beard. Everything else is optional. That means the whole face problem, the thing that stops most beginners cold, simply disappears behind a wall of whiskers.
There’s a second reason gnomes stay popular long after the first one. They’re endlessly variable. Change the angle of the hat and you change the mood. Give one a fishing rod, a broom, a pointed witch’s hat, or a Christmas lantern and you’ve got an entirely different character out of the same three shapes. Carvers who’ve been at it for twenty years still make them, not because they’re easy, but because they’re fun.
They’re also forgiving in a way almost nothing else is. There’s no correct gnome, so a lopsided hat reads as personality rather than error, and a beard cut too deep just looks windswept. Nothing sticks out to snap off, the whole figure stands on its own flat base, and most of them are done in an evening.
The ideas below run from the plainest one-knife gnome to seasonal characters, gnomes with props, and a few that push into carved detail. Each comes with a tip to keep you moving. If you’re still putting a kit together, our guide to choosing the right whittling kit covers what you actually need.
The Gnome Formula
Before the ideas, it’s worth knowing the shape that sits underneath nearly all of them, because once you have it, every gnome on this list is a variation.
Start with a blank around 1″ x 1″ x 4″. Draw a line across it about halfway down: everything above is hat, everything below is body. Make a stop cut all the way around that line, then taper the hat above it to a point, letting the tip flop to one side if you want some character.
Below the line, cut a V under the hat brim to create the nose, which is the only facial feature most gnomes get. Everything under the nose is beard, shaped as a wide wedge flaring down and out, with a few deep grooves cut into it to suggest strands. Leave the bottom of the block square and uncarved so it stands.
That’s the whole formula. Hat, nose, beard, flat base. From there it’s a matter of what the hat looks like, what the gnome is holding, and how you paint it.
20 Beginner-Friendly Gnome Wood Carving Ideas
1. Green-Hatted Ornament Batch
Four at Once, Drying in an Egg Carton
Four small gnome heads lined up in an egg carton, each with a green hat trimmed in white, a warm painted face, and a broad ribbed beard. Carving a batch is the fastest way to get good, because by the fourth hat your hands already know the cuts. The egg carton is the quiet hero here: it holds every piece upright while the paint dries.
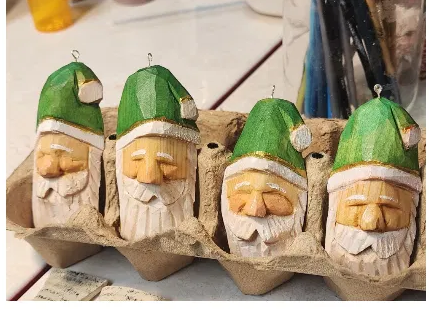
Tip: Cut all four blanks to the same size, then carve one stage across all of them before moving on. Screw eyes in the top turn them into tree ornaments.
2. Hugging Gnome Pair
Two Figures, One Block
Two round-faced gnomes leaning into each other in a hug, one in a yellow hat and one in red, both in patterned coats scattered with tiny flowers. Carving a pair from a single blank is easier than carving two separates, since the shoulders touch and support each other. The back view matters as much as the front here, and the colour-blocked coats carry it.

Tip: Keep them joined all the way down the touching side, and paint the back before the front so your steadier brushwork lands where it shows.
3. Pipe-Smoking Gnome in Dark Wood
Skip the Paint and Let the Grain Show
A stout gnome with a low domed hat pulled down over his eyes, a long beard cut into fine parallel strands running the full length of the body, and a small pipe angled out from under his nose. The unpainted finish is the whole point here, since the dark grain sweeps through the beard and does the texturing work for you.

Tip: Cut the beard strands with a V-tool in one continuous pull from top to bottom. Drill a small hole and glue in a twig for the pipe.
4. Tall Slim Gnome with a Long Beard
Stretch the Proportions and Watch It Change
A narrow, elongated gnome with a bright red coat, a yellow-tipped hat, and an enormous beard running most of the way down the figure to a green base. The exaggerated height turns the standard formula into something quite different, and tall blanks are easier to hold and carve than short ones.

Tip: Work from a long offcut and give the beard at least half the total height. Bold flat colours suit a simple shape better than fine detail.
5. Tall-Hatted Gnome on a Log Slice
Mount It on a Branch Round and Call It Done
A pale gnome with an exceptionally tall, slightly leaning hat, standing on a birch log slice at a Christmas market. The hat takes up more than half the figure and the leaning tip gives it all its charm. A log round with the bark left on costs nothing and turns a small carving into a finished display piece in seconds.

Tip: Let the hat tip lean. A perfectly upright cone looks stiff, and the lean is the difference between a shape and a character.
6. Trio of Unpainted Gnomes
Three Hats, Three Completely Different Moods
Three natural-wood gnomes side by side: one slim with a folded hat, one squat under a broad mushroom cap, and one tall with a pointed tip. Same formula each time, yet the hat alone makes them read as three distinct characters. It’s the clearest argument there is for carving a set rather than a single figure.

Tip: Carve three at once and change only the hat. The heart cut into the middle one shows how little extra detail a plain gnome needs.
7. Gnome on an Uncarved Plinth
Leave the Bottom of the Block Alone
A soft, rounded gnome with a slouched hat and a full teardrop beard, sitting on top of a square column left completely uncarved. That plain plinth does two jobs at once: it gives your holding hand something solid to grip while you work, and it turns the finished piece into a small sculpture without any extra effort.

Tip: Only carve the top third of the blank. The contrast between smooth figure and raw square base is the look, not a shortcut.
8. Fisherman Gnome
Hand It a Prop and Give It a Job
A gnome in a bright yellow rain slicker with a white beard and a tiny fish dangling from a line at his side. The moment a gnome holds something, it stops being a shape and starts being a character with a story. A prop also gives you an easy way to make every gnome in a set different.

Tip: Carve the prop separately and attach it with thread or a pin. A separate fish, broom, or lantern is far easier than carving one attached to the hands.
9. Gnome House and Twisted-Hat Pair
Carve the Home as Well as the Residents
Two gnomes in tall, corkscrewing blue hats standing beside a painted gnome door, one in red and one in purple. The twisting hats give the pair real movement, and the little arched door with its yellow window turns two figures into a scene. A door is just a flat board with a few cuts, so it costs you almost nothing.

Tip: Cut the hat twist as a spiral groove running up the cone. One continuous V-cut is all it takes, and the paint does the rest.
10. Matching Striped-Hat Gnomes
Carve the Same Gnome Twice on Purpose
Two nearly identical gnomes in blue-striped hats with dark boots and pale coats, standing side by side. Repeating a design is the fastest way to improve, because the second one fixes everything you didn’t know was wrong with the first, and a matched pair looks deliberate on a shelf in a way a single figure doesn’t.

Tip: Carve both from the same length of stock, working stage by stage across the two so they stay consistent in size and proportion.
11. Blue and Green Pocket Pair
Two Colours, One Simple Shape
Two round-bodied gnomes with tall smooth hats, big white beards, and small ochre hands resting at their sides, one in blue and one in green. There’s no carved detail beyond the basics, and they work entirely on proportion and colour. Making the same figure in two finishes is the easiest way to get a set that looks designed.

Tip: Keep the hat a smooth unbroken cone. Any texture competes with the beard, and the clean sweep is what makes these read well from across a room.
12. Gnome in Progress, Knife in Hand
This Is What Halfway Looks Like
A pale gnome held in a gloved hand with the carving knife still beside it, the hat and beard shaped but nothing painted. Seeing a piece at this stage is reassuring, since the rough, unfinished look is exactly where every finished gnome passes through. The glove is worth noticing too.

Tip: Wear a cut-resistant glove on your holding hand from the first cut. Small figures mean your fingers are always close to the blade.
13. Toadstool-Hatted Pair
Swap the Cone for a Mushroom Cap
Two gnomes in deep red mushroom caps dotted with white, one with a full grey beard and one in a spotted red coat. Trading the pointed hat for a toadstool is the simplest way to break out of the standard formula, and it instantly moves the figure into fairy-tale territory rather than garden ornament.

Tip: Carve the cap as a wide dome overhanging the head, then add the spots with the tip of a brush handle dipped in white paint.
14. Wide-Brimmed Gnome in Natural Wood
A Hat That Shades the Whole Face
A tall unpainted gnome with a broad floppy brim shadowing his eyes, a long ribbed beard, and stubby boots at the base. The wide brim does something a pointed hat can’t: it casts a real shadow across the face, so the figure reads as mysterious without you carving a single eye.

Tip: Undercut beneath the brim so it genuinely overhangs. The shadow underneath is what creates the face, and it only works if the brim stands proud.
15. Chunky Wide Gnome
Go Broad Instead of Tall
A stout, wide-bodied gnome filling a palm, with a cone hat, a round nose, and a deeply ribbed beard flaring across a barrel chest. Widening the proportions rather than stretching them gives you a solid, huggable figure with far more room to work the beard grooves, and a base so broad it can’t topple.

Tip: Start from a squat blank rather than a long one. The extra width lets you cut the beard strands deeper, which is where the character lives.
16. Miniature Gnome Pair
Shrink It Until It Fits on a Fingertip
Two tiny gnomes held in an open hand, one barely an inch tall, both with pointed hats and simplified beards. Carving small is its own pleasure, and it forces good habits, since at this scale you can’t hide behind detail and every cut has to count. A finished miniature also makes a perfect gift or keyring.

Tip: Simplify ruthlessly. At this size the hat, nose, and beard are all you can fit, and adding anything more just turns the face to mush.
17. Grey-Hatted Gnome with a Penguin
Carve a Companion to Go With It
A gnome in a slouched grey hat with a small red mushroom pinned to it, standing beside a painted penguin in a striped scarf. Pairing a gnome with an animal gives you two quick carves instead of one long project, and the two together tell a story that neither manages alone.

Tip: Carve the companion first while your hand is warmed up. A penguin is just a rounded body with a beak, so it costs you half an hour at most.
18. Garden Gnome Duo
Send Them Outside
Two sturdy gnomes standing among the plants, one in a blue coat with a brown hat and one in green, both with wide brims, painted boots, and belted jackets. Gnomes are the one carving that genuinely belongs outdoors, and seeing a piece you made half-hidden in the greenery is a different pleasure from shelf display.

Tip: Use an exterior finish and keep them off bare soil. Any carving left outside needs sealing on the base as well as the sides.
19. Bark-Textured Garden Gnome
Let the Hat Look Like the Tree It Came From
A gnome shot from behind on a garden path, his tall hat and back worked into rough vertical bark texture while the coat below stays smooth and painted mint green. Texturing one part and leaving the rest clean creates contrast you can’t get from paint alone, and it hides a multitude of uneven cuts.

Tip: Cut the bark texture as irregular vertical gouges of varying depth. Randomness is what sells it, so resist any urge to space them evenly.
20. Detailed Carved Face Gnome
Put the Eyes Back In
A stocky gnome with a full carved face: closed crinkled eyes, a bulbous nose, rosy cheeks, and a thick beard swept into flowing strands, all in warm unpainted wood. After nineteen gnomes hiding behind their whiskers, this one shows what happens when you commit to the face, and it’s the natural next step once the formula feels easy.

Tip: Carve the eyes closed rather than open. Two curved lines with a crease at each corner read as a warm expression and avoid the hardest part entirely.
Making Each Gnome Your Own
Twenty gnomes on one list and not one of them is really a different project. They’re all hat, nose, and beard. What separates them is a handful of choices you make before the first cut, and once you see them as choices rather than designs, you’ll never run out of gnomes to carve.
The hat decides the mood. A tall straight cone is classic, a slouched droop is sleepy, a corkscrew twist is playful, a wide brim is mysterious because of the shadow it throws, and a toadstool cap moves the whole figure into fairy-tale territory. Change nothing else and you have five characters.
The proportions decide the feel. Stretch the blank and you get an elegant, slightly comic figure. Squat it down and you get something solid and huggable with far more room for deep beard grooves. Shrink it to an inch and it becomes a keyring.
The finish decides the world it lives in. Left natural, the grain does the texturing and the piece reads as craft. Painted in flat bold colours, it becomes a toy or an ornament. Textured like bark on the hat and smooth on the coat, it looks like it grew out of a tree.
And the prop decides the story. A pipe, a fishing rod, a lantern, a broom, a penguin standing alongside. Carve the prop separately and attach it with a pin or a dab of glue, and one gnome becomes a fisherman, a gardener, or a night watchman.
Mix any four of those and the combinations run into the hundreds. Carvers who’ve made gnomes for twenty years are still finding new ones, which is the best recommendation the subject has.
Conclusion
The gnome earned its place as the standard first carve honestly. It hides the face behind a beard, stands on its own flat base, has nothing thin enough to snap, and finishes in an evening. But the reason experienced carvers keep coming back to it is different: it’s the most forgiving canvas in the craft, and the fastest way to turn a small block into something with a personality.
Pick whichever gnome on this list made you want to reach for a knife, cut a blank to size, and put the hat brim in first. Then carve another one next week with a different hat and see who turns up. If you’d like to build a set with some variety in it, our easy cat woodcarving ideas and easy dog woodcarving ideas make good companions on the same shelf, and these fun woodcarving ideas you can finish in one sitting will fill the evenings in between.
